“Are you sure these are just cookies?” my friend asked, eyes wide as she bit into the first melt-in-your-mouth Russian Tea Cake. Honestly, I had my doubts at first too. The recipe came from an old handwritten note tucked inside a vintage cookbook, half-forgotten and dust-covered. One chilly afternoon, craving something comforting but not complicated, I decided to give it a shot. The kitchen filled with the warm scent of toasted nuts and vanilla, and I found myself sneaking bites straight from the cooling rack. The buttery crumb, the delicate powdered sugar dusting—it felt like a little snowstorm in my mouth. A quiet comfort, perfect for those slow, cozy moments with a cup of tea or coffee. That unexpected discovery stuck with me, becoming my go-to cookie for gifting or just unwinding after a busy day. There’s something about these Russian Tea Cakes that feels timeless, like a soft whisper of tradition wrapped in buttery sweetness.
Why You’ll Love This Recipe
After making Russian Tea Cakes countless times — honestly, I’ve baked them every week during the holidays — I can confidently say this recipe is a keeper. Here’s why:
- Quick & Easy: You can whip up a batch in under 30 minutes, which is perfect when you want something sweet but don’t want to spend hours in the kitchen.
- Simple Ingredients: No need for fancy or hard-to-find items. Most of these are pantry staples, so you can make these anytime without a special grocery trip.
- Perfect for Cozy Occasions: Whether it’s a quiet afternoon tea, a festive holiday gathering, or just a moment to yourself, these cookies fit right in.
- Crowd-Pleaser: They get rave reviews from kids and adults alike — the melt-in-your-mouth texture makes them irresistible.
- Unbelievably Delicious: The balance of buttery richness with the gentle sweetness of powdered sugar creates a cookie that feels both indulgent and light.
What sets this recipe apart? It’s the finely chopped nuts toasted just right for that subtle crunch and a slight toasty note that makes all the difference. Plus, I like to use real butter (no shortcuts here!) which gives the dough a richness that feels almost like a hug. You won’t find gimmicks or complicated steps, just honest ingredients and a simple method that delivers every single time. Each bite invites you to slow down, savor, and enjoy a moment of calm—something I’ve come to really appreciate in my busy days. It’s the kind of cookie that makes you close your eyes and smile, trusting that simple pleasures are sometimes the best.
What Ingredients You Will Need
This recipe uses simple, wholesome ingredients to deliver bold flavor and that satisfyingly delicate texture without any fuss. Most are staples you probably already have on hand, making this an easy recipe to pull together anytime.
- Unsalted butter, softened (I prefer Kerrygold for its creamy texture and flavor)
- Powdered sugar (for both the dough and the final coating – sifted for smoothness)
- Vanilla extract (pure vanilla adds depth; avoid imitation if possible)
- All-purpose flour (for structure; you can substitute with gluten-free flour blends if needed)
- Finely chopped nuts (traditionally walnuts, toasted lightly to bring out their flavor; pecans also work beautifully)
- Salt (just a pinch to balance the sweetness and enhance flavor)
Notes and substitutions: If you want to make these nut-free, try finely crushed cereal or oat flour for a similar texture. For dairy-free, swap butter with a plant-based margarine that’s firm and sticks to the dough well. During the holiday season, I like to add a touch of cinnamon or nutmeg to the dough for an extra cozy note. For the nuts, always toast them lightly in a dry pan until fragrant – it’s a small step that makes a big difference in flavor.
Equipment Needed
- Mixing bowls (medium and large)
- Electric hand mixer or stand mixer (optional, but helpful for creaming butter and sugar)
- Measuring cups and spoons (for accuracy in baking)
- Fine mesh sieve or sifter (to sift powdered sugar)
- Baking sheet(s) lined with parchment paper or a silicone baking mat
- Cooling rack (to let the cookies cool evenly)
- Food processor (optional, for chopping nuts finely)
If you don’t have a mixer, no worries! You can cream the butter and sugar by hand with a sturdy wooden spoon (just takes a bit more elbow grease). Parchment paper is a game-changer here—it prevents sticking and makes cleanup a breeze. I’ve tried these cookies on baking steel and regular cookie sheets, and both work well, but the even heat of a baking steel can help with better browning on the bottom. For nut chopping, a food processor speeds things up, but a sharp knife and patience work just fine.
Preparation Method
- Toast the nuts: Place 1 cup (120g) of chopped walnuts or pecans in a dry skillet over medium heat. Stir frequently for about 5 minutes until fragrant and lightly browned. Let cool completely before using.
- Cream the butter and sugar: In a large bowl, beat 1 cup (227g) of softened unsalted butter with 1/2 cup (60g) powdered sugar until light, fluffy, and pale—about 3 to 5 minutes. This step traps air, which helps create a tender cookie.
- Add vanilla: Stir in 1 teaspoon of pure vanilla extract until combined.
- Mix dry ingredients: In a separate bowl, whisk together 2 cups (250g) all-purpose flour and 1/4 teaspoon salt.
- Combine nuts and flour: Add the cooled toasted nuts to the dry mix and stir to distribute evenly.
- Form the dough: Gradually add the dry ingredients into the butter mixture, mixing on low speed or folding by hand until a soft dough forms. It should hold together but not be sticky—if it feels crumbly, add a teaspoon of milk or cream.
- Shape the cookies: Preheat the oven to 350°F (175°C). Roll dough into 1-inch (2.5 cm) balls and place them about 1.5 inches (4 cm) apart on parchment-lined baking sheets.
- Bake: Bake for 12 to 15 minutes or until the bottoms are just lightly golden. The tops will look pale; avoid overbaking to keep them tender.
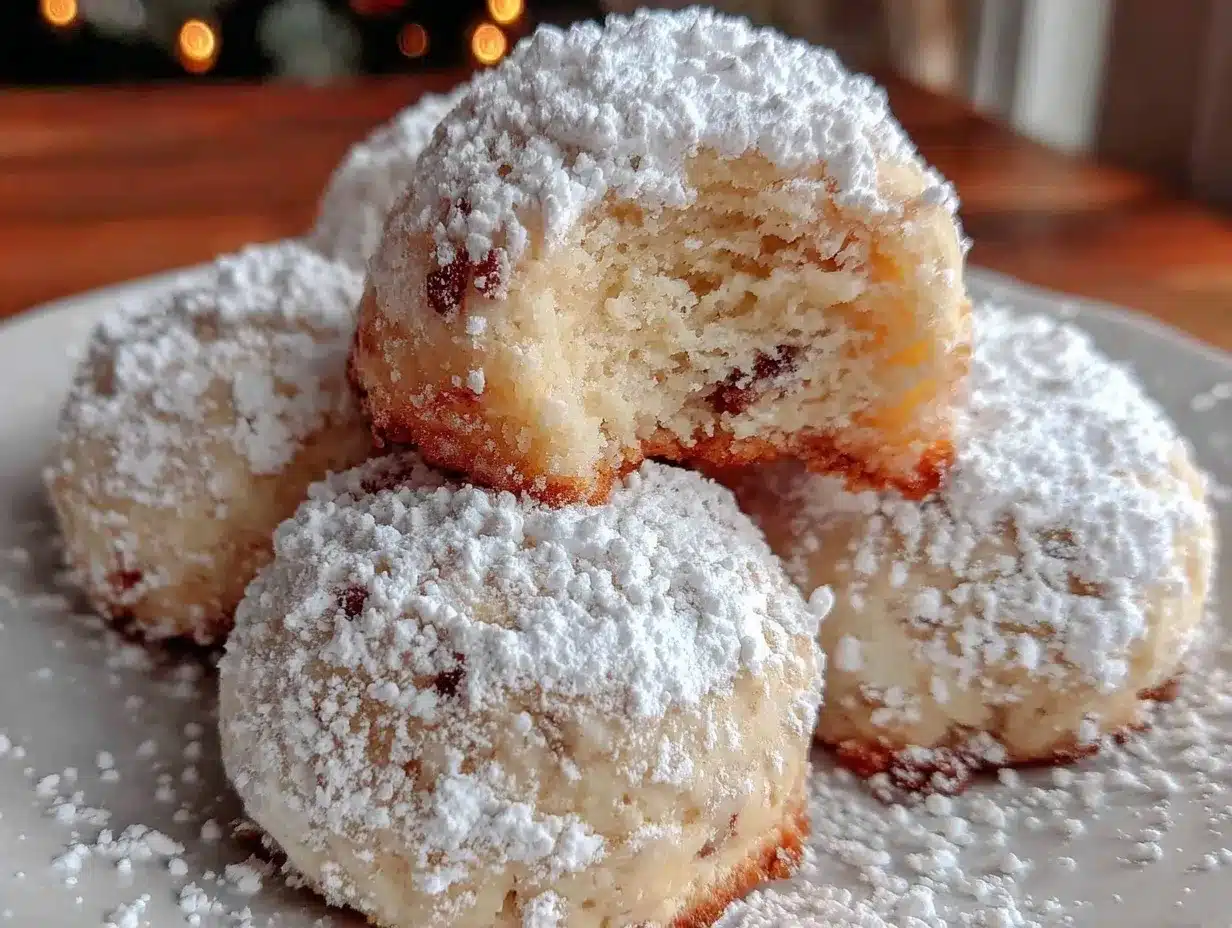
- Cool and coat: Let cookies cool on the sheet for 5 minutes, then carefully roll them in sifted powdered sugar while still warm. Once completely cool, roll them again for a snowy finish.
Pro tip: Don’t skip the double dusting of powdered sugar. It creates that signature snowball look and adds a delicate sweetness with every bite. If the dough feels warm or sticky while shaping, pop it in the fridge for 10 minutes—it firms up nicely and makes rolling easier.
Cooking Tips & Techniques
One thing I learned the hard way is that these cookies rely on gentle handling. Overmixing the dough can develop gluten, turning what should be a tender crumb into something tough. So, mix just until combined and stop.
Toasting nuts is non-negotiable. Raw nuts taste flat and can leave a bitter aftertaste. Toasting releases oils and deepens flavor, which is why I always set a timer and watch them closely. Too dark, and they’ll taste burnt—too light, and they won’t pop.
If you want perfectly round cookies, use a small cookie scoop or measure dough with a teaspoon. This helps with uniform baking. Also, letting the dough chill for 15 minutes before shaping can prevent spreading, especially if your kitchen is warm.
Finally, patience with the powdered sugar is key. Rolling while warm creates a thin glaze; the second coating seals in sweetness and gives that classic, snowy finish. I like to keep a bowl of powdered sugar handy throughout baking to catch any cookie that cools too much before dusting.
Variations & Adaptations
- Nut substitutions: Swap walnuts for pecans, almonds, or pistachios for different flavors and textures. Toast them lightly as usual.
- Spice it up: Add 1/2 teaspoon ground cinnamon or cardamom to the flour mixture for a warm, fragrant twist. It’s especially nice during the holidays.
- Chocolate-dusted: Instead of powdered sugar, try rolling the baked cookies in a mix of powdered sugar and cocoa powder for a rich, mocha-like finish.
- Gluten-free: Use a 1-to-1 gluten-free baking flour blend. Check that your blend contains xanthan gum to help hold the dough together.
- Dairy-free: Replace butter with a firm, non-hydrogenated plant-based margarine and use coconut sugar instead of powdered sugar for coating.
One personal twist I love is adding a teaspoon of orange zest to the dough—it adds a subtle citrus brightness that balances the buttery richness beautifully.
Serving & Storage Suggestions
Russian Tea Cakes are best enjoyed fresh but store beautifully too. Serve them at room temperature with a hot cup of tea, coffee, or even a cozy hot chocolate. Their delicate sweetness pairs well with lightly bitter drinks that cut through the richness.
For gifting or making ahead, store cookies in an airtight container layered with parchment paper at room temperature for up to a week. They also freeze well—wrap tightly and freeze for up to 3 months. To enjoy after freezing, thaw at room temperature and give them a quick roll in powdered sugar to freshen the coating.
Interestingly, these cookies soften slightly over time, becoming even more tender. If you like a bit of crunch, enjoy them within the first couple of days. If you love a melt-in-your-mouth texture, waiting a day or two works wonders.
Nutritional Information & Benefits
Each cookie (approximate) contains about 90 calories, 6 grams of fat, 8 grams of carbohydrates, and 1 gram of protein. The nuts provide heart-healthy fats and a dose of vitamin E and magnesium, which support overall wellness. Using real butter adds richness but also fat-soluble vitamins like A and D.
For those mindful of gluten, this recipe adapts well to gluten-free options. The simplicity of ingredients keeps it free from artificial additives, making it a more wholesome treat compared to many store-bought cookies.
While these cookies are a little indulgence, pairing them with a wholesome breakfast like a baked oatmeal with blueberries can balance your day with nutrients and sweetness.
Conclusion
Russian Tea Cakes have quietly become one of my favorite comfort treats—simple, buttery, and just sweet enough to feel special. They’re the kind of cookie that feels handmade and thoughtful without the fuss, perfect for those moments when you want something cozy and satisfying. I encourage you to try the basic recipe and then make it your own with the variations that speak to your taste buds.
Whether you’re baking for family, friends, or just yourself, these snowball cookies offer a little slice of calm in a busy world. I hope you enjoy them as much as I do—it’s a recipe I keep coming back to, every season and every occasion. And hey, if you’re ever in the mood for something equally comforting but savory, I’ve had great results with the crispy lemon herb chicken, which pairs surprisingly well with a cookie dessert like this!
FAQs
Can I make Russian Tea Cakes ahead of time?
Yes! They store well at room temperature in an airtight container for up to a week and freeze beautifully for up to 3 months.
What nuts work best in Russian Tea Cakes?
Traditionally walnuts are used, but pecans, almonds, or even pistachios are great alternatives. Just toast them lightly for the best flavor.
How do I keep my Russian Tea Cakes from crumbling?
Don’t overmix the dough, and make sure your butter is softened but not melted. If the dough feels too crumbly, add a teaspoon of milk or cream to help it come together.
Can I make these cookies gluten-free?
Absolutely. Use a 1-to-1 gluten-free baking blend with xanthan gum for the best texture.
Why do I need to roll the cookies in powdered sugar twice?
The first coating while warm creates a light glaze, and the second after cooling gives the classic snowball look and adds extra sweetness and texture.
Pin This Recipe!
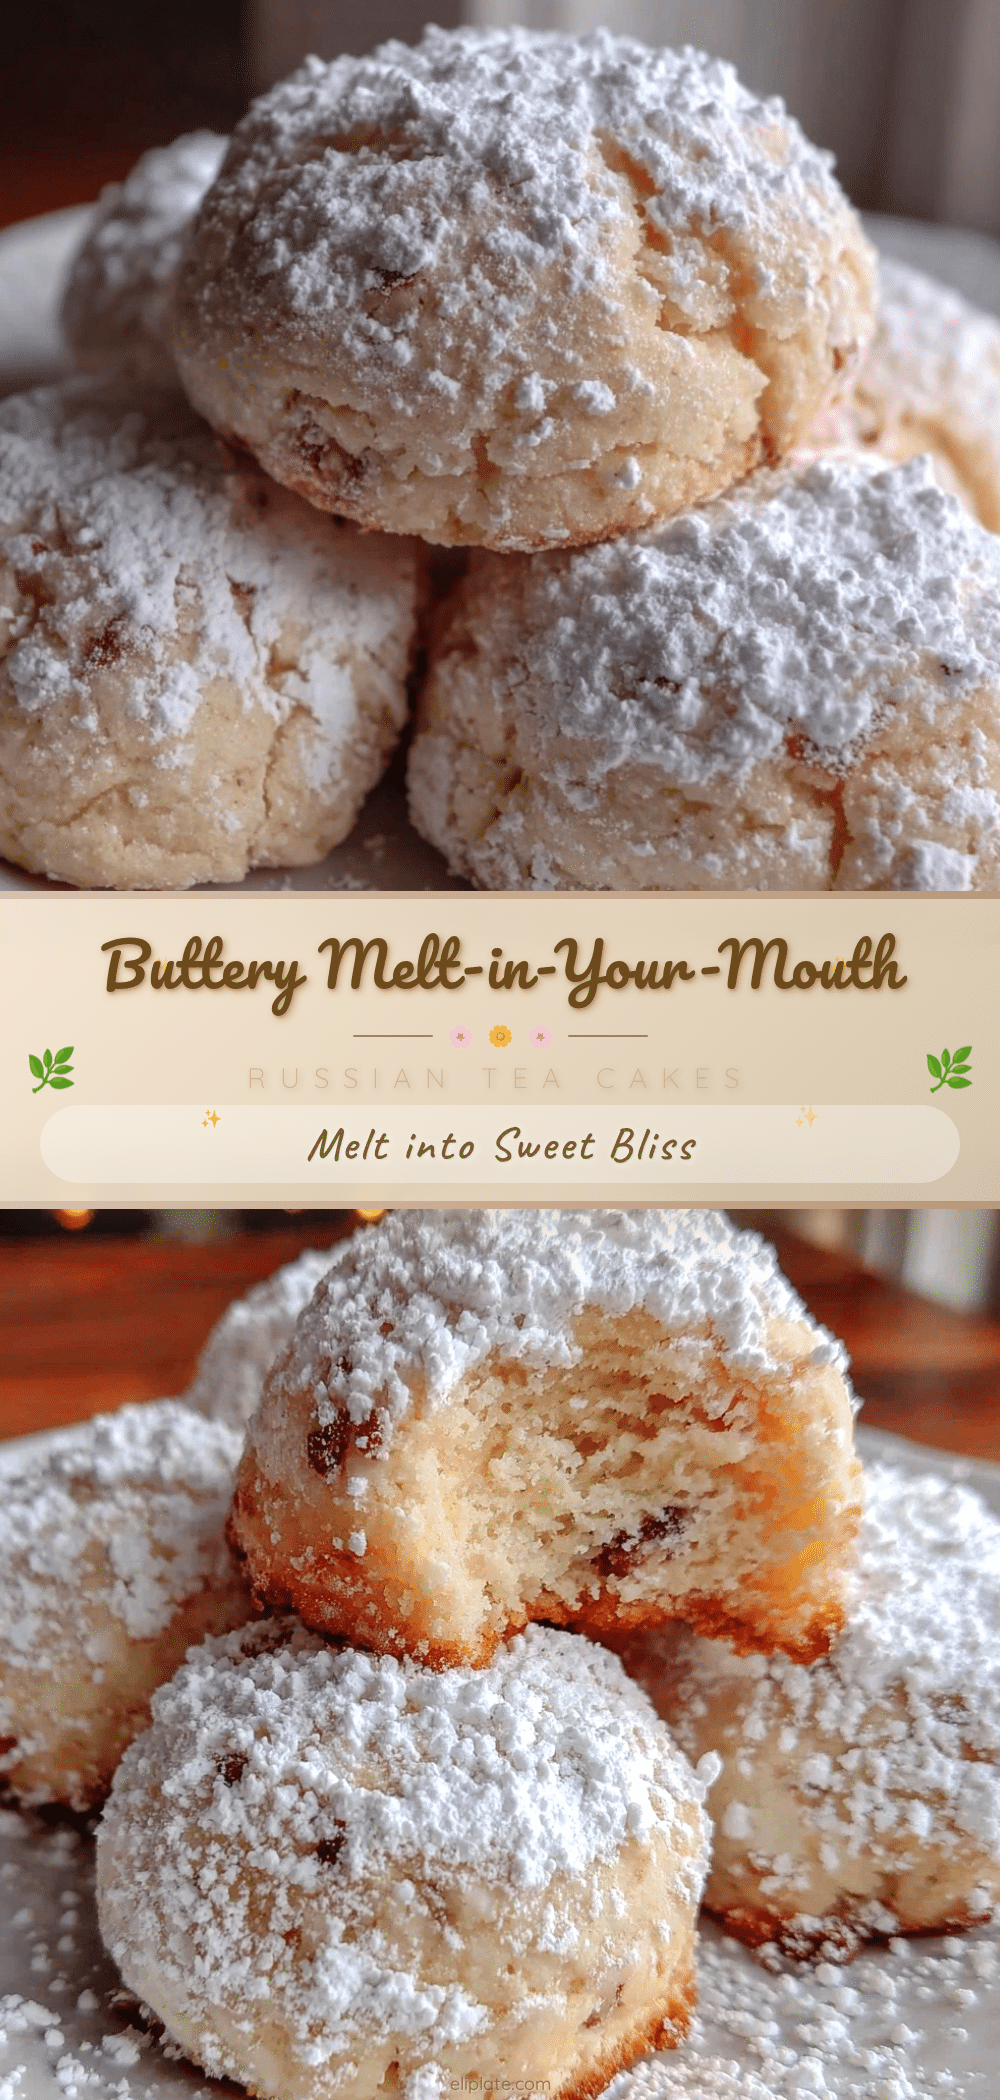
Russian Tea Cakes
Delicate, melt-in-your-mouth snowball cookies with a buttery crumb and a double dusting of powdered sugar, perfect for cozy occasions and gifting.
- Prep Time: 15 minutes
- Cook Time: 15 minutes
- Total Time: 30 minutes
- Yield: 24 cookies 1x
- Category: Dessert
- Cuisine: Russian
Ingredients
- 1 cup (227g) unsalted butter, softened
- 1/2 cup (60g) powdered sugar, plus more for coating
- 1 teaspoon pure vanilla extract
- 2 cups (250g) all-purpose flour
- 1 cup (120g) finely chopped walnuts or pecans, toasted
- 1/4 teaspoon salt
Instructions
- Toast the nuts: Place 1 cup (120g) of chopped walnuts or pecans in a dry skillet over medium heat. Stir frequently for about 5 minutes until fragrant and lightly browned. Let cool completely before using.
- Cream the butter and sugar: In a large bowl, beat 1 cup (227g) of softened unsalted butter with 1/2 cup (60g) powdered sugar until light, fluffy, and pale—about 3 to 5 minutes.
- Add vanilla: Stir in 1 teaspoon of pure vanilla extract until combined.
- Mix dry ingredients: In a separate bowl, whisk together 2 cups (250g) all-purpose flour and 1/4 teaspoon salt.
- Combine nuts and flour: Add the cooled toasted nuts to the dry mix and stir to distribute evenly.
- Form the dough: Gradually add the dry ingredients into the butter mixture, mixing on low speed or folding by hand until a soft dough forms. If crumbly, add a teaspoon of milk or cream.
- Shape the cookies: Preheat oven to 350°F (175°C). Roll dough into 1-inch (2.5 cm) balls and place 1.5 inches (4 cm) apart on parchment-lined baking sheets.
- Bake: Bake for 12 to 15 minutes or until bottoms are lightly golden. Tops should remain pale.
- Cool and coat: Let cookies cool on the sheet for 5 minutes, then roll in sifted powdered sugar while warm. Once cool, roll again for a snowy finish.
Notes
Toast nuts lightly in a dry pan until fragrant to enhance flavor. Avoid overmixing dough to keep cookies tender. Double dusting with powdered sugar creates the classic snowball look and sweetness. If dough is sticky, chill for 10-15 minutes before shaping. Use a cookie scoop or teaspoon for uniform cookies. Variations include adding cinnamon, cardamom, or orange zest, and substitutions for gluten-free or dairy-free diets.
Nutrition
- Serving Size: 1 cookie
- Calories: 90
- Fat: 6
- Carbohydrates: 8
- Protein: 1
Keywords: Russian Tea Cakes, snowball cookies, melt-in-your-mouth cookies, holiday cookies, nut cookies, buttery cookies