I burned the glaze on my baby back ribs three times before I finally understood what was going wrong. Honestly, I wasn’t even sure if I liked ribs that much when I first started messing with this recipe. I kept thinking the sweet honey glaze would overpower the meat, or worse—the ribs would come out dry and tough, like those sad ribs you get at some chain places. But after a few frustrating attempts, some slightly charred edges, and a lot of patience, I landed on this oven-baked recipe that’s become my go-to when I want ribs with that perfect balance of savory, sweet, and tender.
It all started one late afternoon, when the smell of honey and smoky spices filled the kitchen, and I caught myself sneaking a bite before dinner was even served. The ribs were juicy, tender enough to pull apart with just a fork, and the glaze had that sticky-sweet finish without being cloying. You know that mix of warmth and comfort that makes you want to sit down and savor every bite? That’s exactly what this recipe delivers.
What surprised me the most was how straightforward it was to get that oven-baked perfection without firing up the grill or smoking for hours. It’s kind of funny—after all the trial and error, I realized this recipe stuck because it’s forgiving and doesn’t ask for special equipment or fancy techniques. Just simple ingredients, some patience, and your oven.
Now, whenever I make these ribs, it’s like coming home. They remind me of those slow Sunday dinners where the kitchen smells like honey, garlic, and a hint of spice, and everyone’s gathered around, digging into something truly satisfying. This recipe isn’t about flashy cooking tricks—it’s about honest, straightforward flavor that sticks with you. And that’s why I keep coming back to it.
Why You’ll Love This Recipe
This savory honey-glazed baby back ribs recipe is the kind of dish that makes you feel like a kitchen pro, even if you’ve never cooked ribs before. I’ve tested this recipe countless times, tweaking the glaze and baking times to nail that tender, juicy texture every single time. It’s been family-approved and wins over all kinds of crowds—trust me, picky eaters included.
- Quick & Easy: The ribs take about 2.5 hours total, but most of that time is hands-off baking. Perfect for when you want great ribs without babysitting the grill.
- Simple Ingredients: No exotic sauces or hard-to-find spices here—just pantry staples like honey, garlic, and a handful of spices.
- Perfect for Any Occasion: Whether it’s a weekend dinner, a casual party, or a laid-back family gathering, these ribs fit right in.
- Crowd-Pleaser: The balance of sweet honey and savory spices means everyone keeps coming back for more.
- Unbelievably Delicious: The sticky glaze caramelizes just right, creating a crispy exterior that contrasts beautifully with the tender meat inside.
What makes this recipe stand out is the way the honey glaze is layered in stages, allowing the flavors to build gradually rather than overwhelming the ribs all at once. Plus, the slow oven bake ensures that the ribs stay moist and tender, not falling apart but pulling away cleanly from the bone. It’s a little trick I picked up after those early burned glaze attempts.
This isn’t just any rib recipe—it’s the one that gets me excited to cook ribs at home, without all the fuss and guesswork. And honestly, it’s the kind of meal that makes you pause and appreciate the simple joy of good food.
What Ingredients You Will Need
This recipe uses simple, wholesome ingredients to deliver bold flavor and satisfying texture without the fuss. Most of these are pantry staples, so you probably won’t need to make a special trip to the store.
- Baby back ribs: 2 racks (about 2 to 2.5 pounds / 900 to 1100 grams total)
- Honey: ⅓ cup (use your favorite local or wildflower honey for the best flavor)
- Brown sugar: ¼ cup (light or dark, depending on your preference for a deeper molasses flavor)
- Garlic powder: 1 teaspoon (adds that subtle savory note)
- Onion powder: 1 teaspoon
- Smoked paprika: 1 tablespoon (for a mild smoky flavor without a smoker)
- Ground black pepper: 1 teaspoon
- Salt: 1.5 teaspoons (kosher salt preferred for even seasoning)
- Cayenne pepper: ¼ teaspoon (optional, if you like a bit of heat)
- Apple cider vinegar: 2 tablespoons (helps balance the sweetness and tenderizes the meat)
- Olive oil: 1 tablespoon (to help the dry rub stick and add richness)
Ingredient tips: I recommend using ribs that are well-trimmed of excess fat for even cooking. If you want to give a nod to seasonal flavors, try pairing these ribs with a fresh side like a heirloom tomato tart—the acidity cuts through the glaze beautifully.
Substitutions: If you need a gluten-free option, this recipe is naturally safe as long as your brown sugar and spices are certified gluten-free. Swap honey with maple syrup if you want a different sweet note, but the flavor will shift slightly. For a vegan twist, try using a plant-based rib substitute and omit the meat.
Equipment Needed
- Large baking sheet: A rimmed sheet pan to catch drips and hold the ribs comfortably.
- Aluminum foil: For wrapping the ribs during baking to keep them moist.
- Mixing bowl: To mix the honey glaze and dry rub ingredients.
- Pastry brush: For applying the honey glaze evenly (a silicone brush works best).
- Sharp knife: To trim any excess fat or silver skin from the ribs.
- Tongs: For handling hot ribs safely.
- Meat thermometer (optional): Helpful to check for doneness, though the ribs are tender when the meat pulls back from the bone.
If you don’t have a roasting pan, a large oven-safe dish with a rack works fine. I’ve also baked these ribs on a wire rack placed over a baking sheet to let the fat drip away, which helps with crispier edges. For budget-friendly options, aluminum foil pans work well and make cleanup a breeze.
Preparation Method
- Preheat your oven: Set it to 300°F (150°C). Low and slow is the secret to tender ribs that aren’t dry.
- Prepare the ribs: Remove the silver skin membrane from the back of the ribs if your butcher hasn’t done this. I know it sounds fussy, but this step really helps the seasoning and glaze penetrate the meat better.
- Make the dry rub: In a bowl, combine brown sugar, garlic powder, onion powder, smoked paprika, salt, black pepper, and cayenne pepper (if using). Mix well so the spices are evenly distributed.
- Coat the ribs: Rub olive oil all over the ribs, then generously apply the dry rub on both sides, pressing it into the meat. Let the ribs rest for at least 15 minutes at room temperature. This gives the flavors a chance to settle in.
- Wrap the ribs: Place each rack on a large piece of foil, meat side up. Wrap tightly to seal in juices during baking. Place the foil-wrapped ribs on a baking sheet.
- Bake low and slow: Put the ribs in the oven and bake for 2 hours. This slow heat breaks down connective tissue, making the ribs tender but not falling apart.
- Prepare the honey glaze: While ribs bake, whisk together honey and apple cider vinegar in a small bowl. The vinegar adds a subtle tang that balances the sweetness.
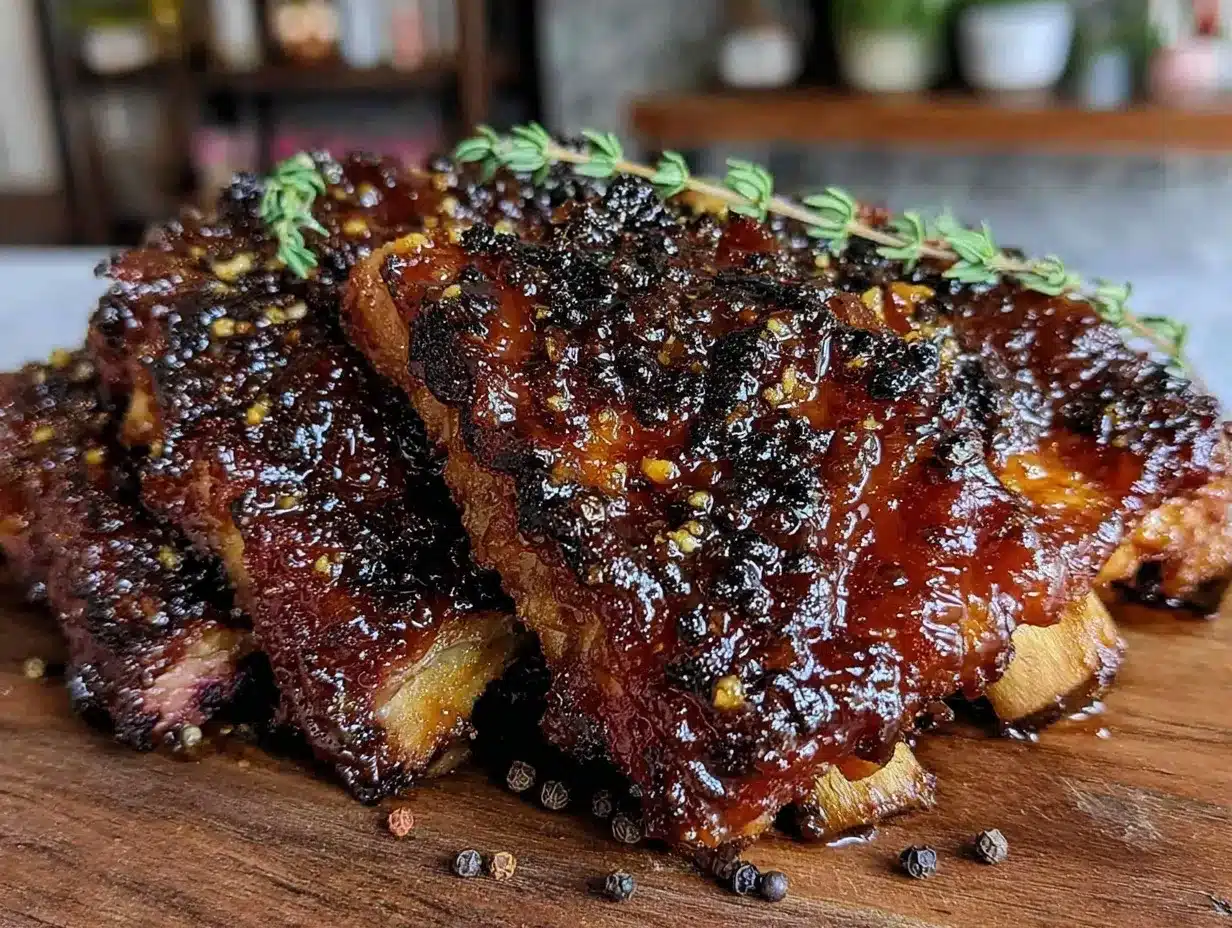
- Glaze and finish baking: After 2 hours, carefully unwrap the ribs (watch out for steam!). Brush the honey glaze evenly over the ribs. Return to the oven, uncovered, and bake for another 20-30 minutes at 350°F (175°C). This step caramelizes the glaze, creating that sticky, shiny coating.
- Rest and serve: Remove ribs from the oven and let them rest for 10 minutes before slicing. This helps the juices redistribute and keeps the meat moist.
Pro tip: If the glaze starts to darken too quickly in the last step, loosely tent with foil to prevent burning. The ribs should smell sweet and smoky, and when you press the meat, it should feel tender but still hold together.
Cooking Tips & Techniques
Getting ribs right in the oven is all about timing and temperature. I learned the hard way that cranking up the heat to rush things just dries out the meat. Slow baking at 300°F (150°C) is key—it breaks down the collagen so the ribs are tender but still sliceable, not falling apart into mush.
Applying the honey glaze in stages helps avoid burning. Honey is sugar, and sugar can go from caramelized to burnt in a flash. So, waiting until the ribs are nearly done before glazing helps keep that perfect sticky texture.
Another trick is removing the silver skin membrane on the back of the ribs. It’s a thin, tough layer that can make ribs chewy if left on. Removing it allows the flavors to soak in better and makes the ribs easier to eat.
When I first started, I skipped resting the ribs after baking and ended up with juice running everywhere when slicing. Waiting 10 minutes post-bake really locks in those flavors and makes serving less messy.
Multitasking tip: While ribs bake, use the time to prep a fresh side like a savory stuffed yellow squash boats or whip up a tangy slaw to balance the sweetness of the glaze.
Variations & Adaptations
- Spicy Honey Glaze: Add a tablespoon of hot sauce or crushed red pepper flakes to the honey glaze for a kick that plays nicely with the smoky paprika.
- Maple and Mustard Twist: Swap half the honey for pure maple syrup and add a tablespoon of Dijon mustard to the glaze for a tangy-sweet flavor with depth.
- Gluten-Free Version: This recipe is naturally gluten-free if you use gluten-free brown sugar and spices. For a grain-free dry rub, consider using coconut sugar instead of brown sugar.
- Slow Cooker Adaptation: If you prefer slow cooking, you can rub the ribs and cook them in a slow cooker on low for 6-7 hours, then finish under the broiler with the honey glaze for 5-7 minutes to caramelize.
- Personal Favorite: I sometimes add a splash of bourbon to the glaze for a deeper flavor—reminds me of my bourbon peach BBQ pork chops recipe, which also nails that balance of sweet and savory.
Serving & Storage Suggestions
These ribs are best served warm, right out of the oven, when the glaze is sticky and the meat is juicy. I like to plate them with simple sides like a crisp salad or roasted veggies. Fresh, tangy sides such as a grilled peach and burrata salad bring a nice balance to the richness.
Leftover ribs keep well in the refrigerator for 3-4 days. Store them in an airtight container with any remaining glaze on the side to refresh before reheating. To reheat, wrap ribs in foil and warm in a 300°F (150°C) oven for 15-20 minutes to keep them moist.
If you want to freeze leftovers, wrap ribs tightly in plastic and foil to prevent freezer burn. Thaw overnight in the fridge, then reheat as above. The flavors tend to develop even more after a day, so sometimes I intentionally make these a day ahead.
Nutritional Information & Benefits
This recipe offers a satisfying balance of protein and flavor without unnecessary additives. A serving of ribs (about 4-5 ounces / 115-140 grams) provides roughly 300-350 calories, depending on glaze amount, with a good source of iron and zinc from the pork.
Honey, while sweet, contains antioxidants and trace vitamins, and using it in moderation keeps the glaze flavorful without overloading on sugar. The smoked paprika adds a hint of vitamin A and antioxidants as well.
For those monitoring carbs, the recipe is moderate, mainly from the honey and brown sugar. It’s naturally gluten-free if you use certified ingredients, and free from artificial preservatives.
Conclusion
These savory honey-glazed baby back ribs have become a staple in my kitchen because they’re reliable, flavorful, and just downright comforting. They remind me that sometimes patience and simple ingredients are all you need to make something truly delicious.
Feel free to tweak the glaze to your taste—add more heat, swap sweeteners, or try different spice blends. That’s the beauty of this recipe: it’s a solid foundation that invites your personal touch.
Honestly, I love how this recipe turns an intimidating dish into something anyone can master. It’s proof that good ribs don’t have to come from a smoker or require hours of fussing. Just honey, spice, and your oven.
If you try it, I’d love to hear how you made it your own. Share your twists and triumphs—there’s nothing better than swapping rib stories with fellow home cooks.
Frequently Asked Questions
How do I know when baby back ribs are done?
The ribs are done when the meat has pulled back about ¼ inch from the bone ends, and the texture is tender but not falling apart. You can also test by gently twisting a bone; it should move easily.
Can I use this honey glaze on other types of ribs?
Yes! This glaze works well with spare ribs or St. Louis-style ribs, but you may need to adjust cooking times since those cuts are larger and thicker.
Is it necessary to remove the silver skin from the ribs?
Removing the silver skin helps the ribs absorb flavors better and results in more tender meat. It’s not required, but highly recommended for the best texture.
Can I make this recipe on a grill instead of the oven?
You can, but you’ll want to cook the ribs over indirect heat for about 1.5 to 2 hours, then apply the honey glaze during the last 15 minutes over direct heat to caramelize without burning.
What sides pair well with honey-glazed baby back ribs?
Fresh salads, grilled veggies, or something tangy like crispy fried green tomatoes make excellent accompaniments that cut through the richness.
Pin This Recipe!
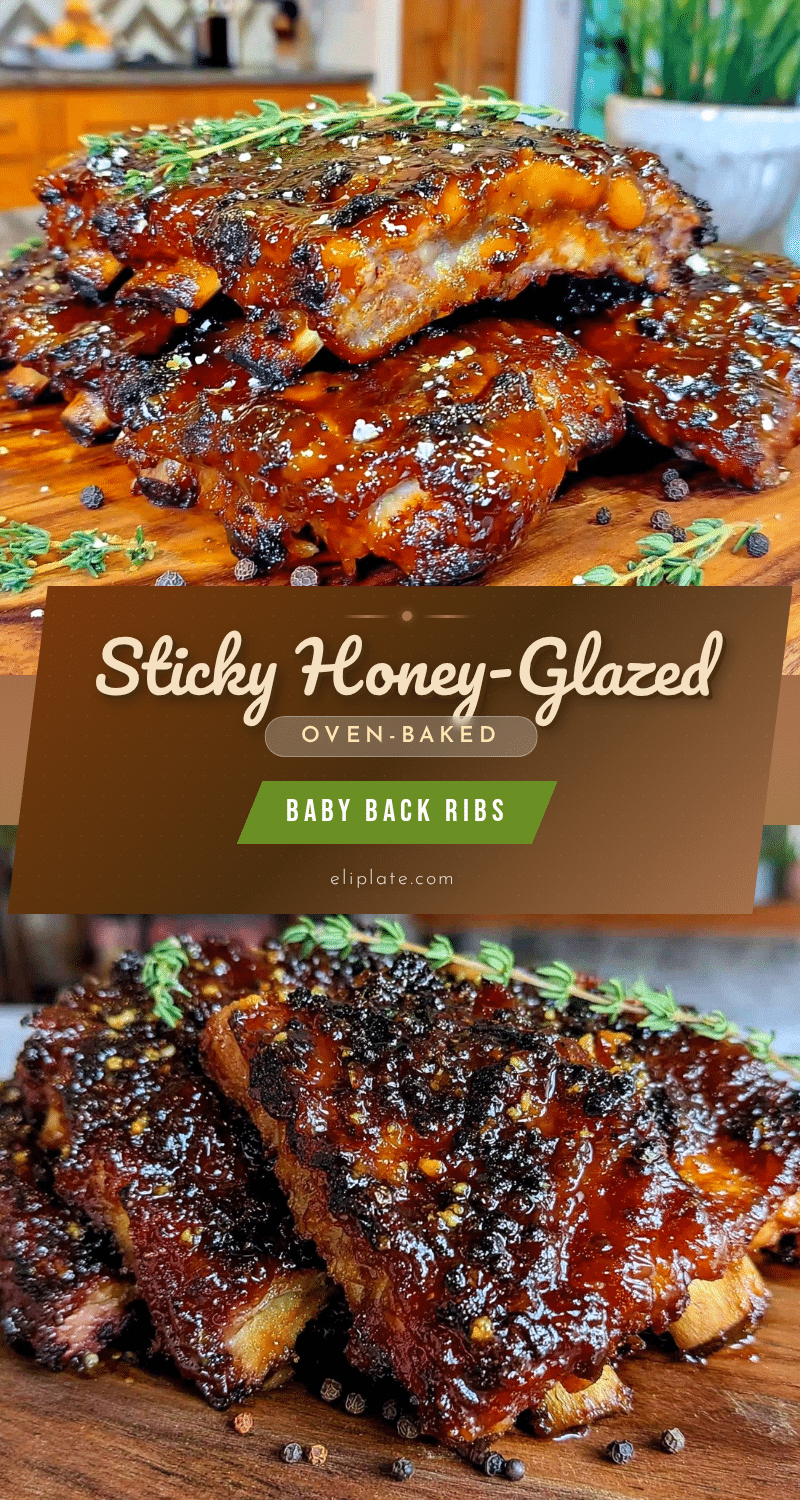
Savory Honey-Glazed Baby Back Ribs Recipe Easy Oven-Baked Perfection
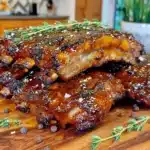
This oven-baked baby back ribs recipe delivers tender, juicy ribs with a perfect balance of savory spices and a sweet honey glaze. It’s easy to make with simple ingredients and requires no special equipment.
- Prep Time: 20 minutes
- Cook Time: 2 hours 30 minutes
- Total Time: 2 hours 50 minutes
- Yield: 4 servings 1x
- Category: Main Course
- Cuisine: American
Ingredients
- 2 racks baby back ribs (about 2 to 2.5 pounds / 900 to 1100 grams total)
- ⅓ cup honey
- ¼ cup brown sugar (light or dark)
- 1 teaspoon garlic powder
- 1 teaspoon onion powder
- 1 tablespoon smoked paprika
- 1 teaspoon ground black pepper
- 1.5 teaspoons kosher salt
- ¼ teaspoon cayenne pepper (optional)
- 2 tablespoons apple cider vinegar
- 1 tablespoon olive oil
Instructions
- Preheat your oven to 300°F (150°C).
- Remove the silver skin membrane from the back of the ribs if not already removed.
- In a mixing bowl, combine brown sugar, garlic powder, onion powder, smoked paprika, salt, black pepper, and cayenne pepper (if using). Mix well.
- Rub olive oil all over the ribs, then generously apply the dry rub on both sides, pressing it into the meat. Let the ribs rest for at least 15 minutes at room temperature.
- Place each rack on a large piece of aluminum foil, meat side up. Wrap tightly to seal in juices and place on a rimmed baking sheet.
- Bake the ribs in the oven for 2 hours.
- While ribs bake, whisk together honey and apple cider vinegar in a small bowl to make the glaze.
- After 2 hours, carefully unwrap the ribs and brush the honey glaze evenly over them.
- Return the ribs to the oven, uncovered, and bake at 350°F (175°C) for another 20-30 minutes to caramelize the glaze.
- Remove ribs from the oven and let rest for 10 minutes before slicing and serving.
Notes
Remove the silver skin membrane for better flavor absorption and tenderness. Apply honey glaze only near the end of baking to prevent burning. Let ribs rest 10 minutes after baking to keep juices locked in. If glaze darkens too quickly, tent loosely with foil. For a spicy twist, add hot sauce or crushed red pepper flakes to the glaze.
Nutrition
- Serving Size: About 4-5 ounces (11
- Calories: 325
- Sugar: 18
- Sodium: 700
- Fat: 18
- Saturated Fat: 6
- Carbohydrates: 20
- Fiber: 1
- Protein: 25
Keywords: baby back ribs, honey glazed ribs, oven baked ribs, easy ribs recipe, savory ribs, sweet and savory ribs, honey glaze, barbecue ribs, tender ribs