Introduction
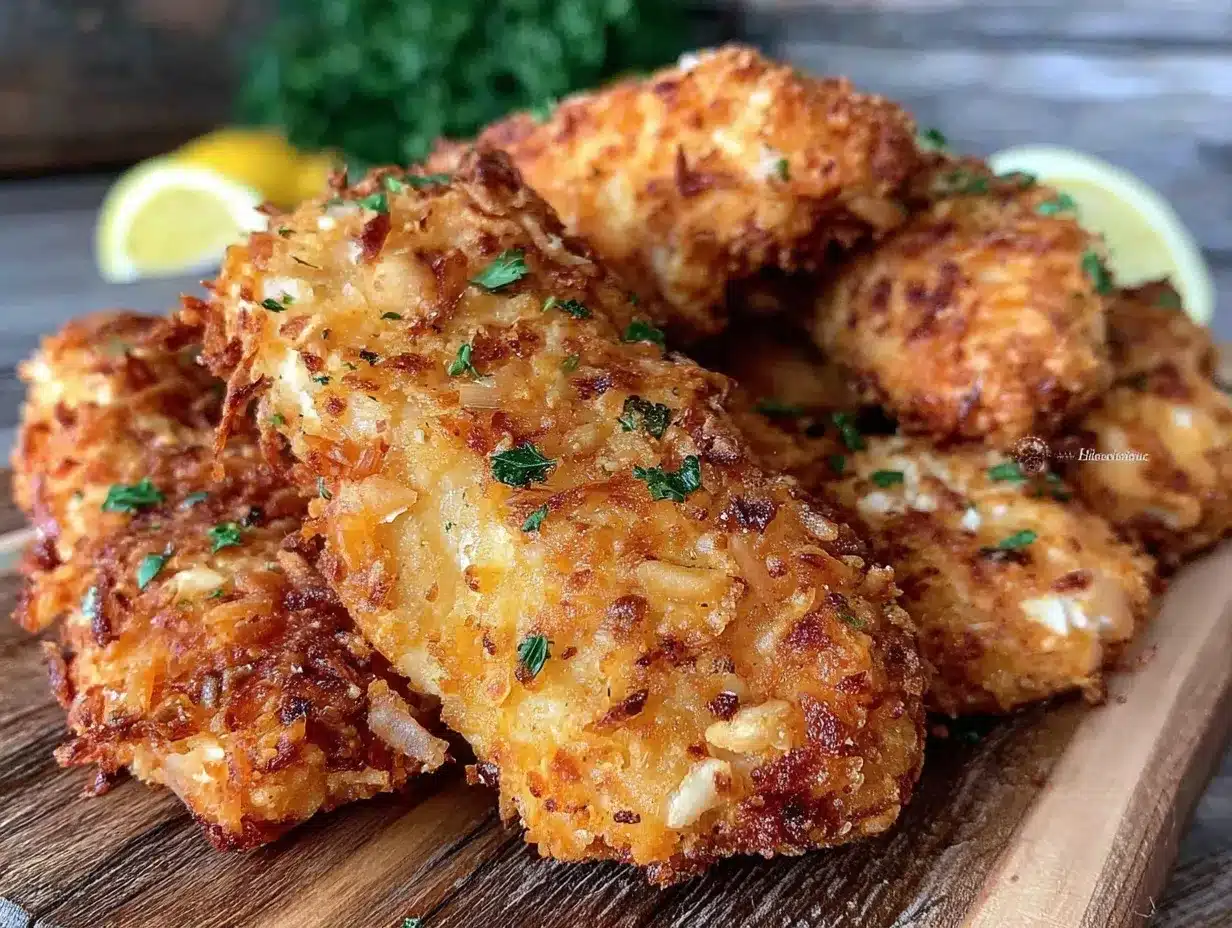
It was one of those evenings where the fridge was barely holding on, and the idea of a complicated dinner felt like climbing Everest. Honestly, I was craving something crunchy, comforting, and quick—but with a twist that didn’t upset my gluten sensitivity. I stumbled on this recipe almost by accident while trying to adapt my favorite chicken tenders to a gluten-free diet. At first, I was skeptical; gluten-free coatings often end up soggy or flavorless, you know? But after a few tweaks—like swapping out the usual flour for a blend of rice flour and almond meal and adding a pinch of smoked paprika—the results were surprising. Those tenders had the perfect crispy exterior with a wholesome crunch that made me forget all about gluten.
Since that night, I’ve made these crispy gluten-free chicken tenders more times than I can count—sometimes twice a week. They’ve become my go-to when I want something satisfying without a ton of prep or worrying about allergens. The best part? They’re kid-approved (which honestly, makes me feel like a kitchen wizard), and they come together faster than most frozen options. There’s just something about that golden, crunchy crust paired with juicy chicken that feels like a small victory on a hectic day.
What sticks with me is how this recipe turned a “just get dinner on the table” moment into something that feels warm and satisfying. It’s not fancy, but it’s real food that you can trust to deliver on taste and texture. I think that’s why it’s stayed with me—it’s a little crunchy hug on a plate, gluten-free and guilt-free too.
Why You’ll Love This Recipe
- Quick & Easy: Comes together in about 30 minutes, perfect for busy weeknights or last-minute cravings.
- Simple Ingredients: No specialty stores needed; all pantry staples like rice flour, almond meal, and basic spices.
- Perfect for Family Meals: Great for lunchboxes, casual dinners, or even game day snacks.
- Crowd-Pleaser: Both kids and adults clamor for seconds, thanks to the crispy texture and well-seasoned bite.
- Unbelievably Delicious: The crunchy coating traps juicy, tender chicken inside, creating the kind of comfort food you want again and again.
- This isn’t your average gluten-free chicken tender recipe. The secret lies in the double coating technique and adding a touch of smoked paprika and garlic powder for a flavor punch that feels homemade but restaurant-quality.
- Plus, the almond meal adds a subtle nuttiness that complements the chicken without overpowering it.
- This recipe isn’t just about avoiding gluten—it’s about making food that satisfies cravings and feels wholesome. You’ll find yourself reaching for these tenders on the days when you want something crunchy but don’t want to compromise on flavor or texture.
What Ingredients You Will Need
This recipe uses simple, wholesome ingredients to deliver bold flavor and that satisfying crunch without fuss. Most are pantry staples, and substitutions are easy if needed.
- Chicken Tenders: Fresh, boneless, skinless chicken tenderloins (about 1 pound / 450g). You can use chicken breast strips if needed.
- Rice Flour: ½ cup (60g) – acts as the main gluten-free coating base, providing a light, crisp texture.
- Almond Meal: ½ cup (50g) – adds a nutty flavor and crunch. I like Bob’s Red Mill for consistent quality.
- Eggs: 2 large, beaten – helps the coating stick and adds moisture.
- Unsweetened Almond Milk: ¼ cup (60ml) – for dipping, keeps the chicken moist (you can swap for any dairy or non-dairy milk).
- Panko-Style Gluten-Free Breadcrumbs: ½ cup (50g) – optional for extra crunch; I recommend a brand like Schär or Ian’s.
- Smoked Paprika: 1 teaspoon – adds warmth and subtle smokiness.
- Garlic Powder: 1 teaspoon – boosts savory depth.
- Onion Powder: ½ teaspoon – balances the seasoning.
- Salt & Pepper: To taste – essential for flavor balance.
- Olive Oil or Avocado Oil: For frying or baking – both have high smoke points suitable for crisp cooking.
If you want to make this recipe nut-free, simply replace almond meal with extra rice flour or gluten-free cornmeal for that crunch. For dairy-free needs, any plant-based milk works fine.
Equipment Needed
- Mixing Bowls: At least two, one for the wet ingredients and one for the dry coating mixture.
- Shallow Plates or Pie Dishes: For dredging chicken pieces—makes the coating process easier and more even.
- Frying Pan or Skillet: A heavy-bottomed skillet, preferably non-stick or cast iron, works best for frying the tenders.
- Wire Rack: For draining the cooked tenders; this keeps them crispy instead of soggy.
- Tongs: For flipping and handling hot tenders safely.
- Baking Sheet: If you prefer baking over frying, line it with parchment paper for easy cleanup.
For those on a budget, a regular non-stick skillet and basic mixing bowls will do just fine. I find that using a wire rack instead of paper towels under the tenders makes a big difference in crispness—something I learned after many soggy trials!
Preparation Method
- Prep the Chicken (5 minutes): Pat the chicken tenders dry with paper towels. This step is crucial to help the coating stick better. If the tenders are uneven in size, trim them to similar thickness for even cooking.
- Mix Dry Ingredients (3 minutes): In a shallow bowl, combine rice flour, almond meal, gluten-free breadcrumbs (if using), smoked paprika, garlic powder, onion powder, salt, and pepper. Stir until evenly mixed.
- Prepare Wet Mixture (2 minutes): In another bowl, whisk together the eggs and almond milk until smooth. This wet dip will help the coating adhere to the chicken.
- Coat the Chicken (10 minutes): Dip each chicken tender first into the wet mixture, letting excess drip off, then dredge thoroughly in the dry mixture. For extra crunch, repeat the wet then dry coating step once more. Place coated tenders on a plate, ready for cooking.
- Cook the Tenders (15 minutes): Heat 2 tablespoons of oil in your skillet over medium heat. Once shimmering, add tenders in a single layer (don’t overcrowd). Cook for about 3-4 minutes per side or until golden brown and cooked through (internal temp 165°F / 74°C). Adjust heat as needed to avoid burning the coating.
- Drain & Rest (2 minutes): Transfer cooked tenders to a wire rack set over a baking sheet to drain excess oil and keep them crispy. Let rest for a few minutes before serving.
Pro tip: If baking, preheat oven to 425°F (220°C). Place tenders on parchment-lined baking sheet, spray lightly with oil, bake 10-12 minutes, flip, and bake another 8-10 minutes until crisp and cooked through.
Cooking Tips & Techniques
One of the things I’ve learned making these crispy gluten-free chicken tenders is that moisture control is everything. If your chicken is too wet, the coating slips off or turns soggy. That’s why patting dry and letting the coating set for a minute before cooking helps a lot.
Another tip: don’t rush the frying process. Medium heat is your friend here. Too hot and the coating burns before the chicken cooks through; too low and you lose the crunch. I usually test with one tender first to dial in the temperature.
Double-coating makes a big difference. The first layer sticks to the chicken, the second builds that satisfying crunch. Trust me, this step is worth the extra few minutes.
If you try oven baking, don’t skip the oil spray! It’s what helps create that golden crust. Also, flip tenders halfway to get even browning.
Lastly, I’ve found that resting the tenders on a wire rack instead of paper towels keeps them crisp longer—paper towels trap steam and make the coating soggy. A small thing that makes a big difference.
Variations & Adaptations
- Spicy Kick: Add ½ teaspoon cayenne pepper or chili powder to the dry mix for a little heat.
- Herb Infusion: Toss in dried oregano, thyme, or rosemary to the coating for an herby twist.
- Nut-Free Version: Replace almond meal with extra rice flour or gluten-free cornmeal to avoid nuts.
- Air-Fried Option: Cook tenders in an air fryer at 400°F (200°C) for 10-12 minutes, flipping halfway, for less oil and less mess.
- Buttermilk Marinate: Marinate chicken in dairy or coconut-based buttermilk for an hour before coating to add tenderness and tang.
One time, I swapped the almond meal for crushed gluten-free cornflakes—gave the tenders a totally different but equally delicious crunch that my kids begged me to try again. It’s fun to experiment depending on what’s in your pantry.
Serving & Storage Suggestions
Serve these crispy gluten-free chicken tenders hot and fresh for the best crunch. They pair wonderfully with a simple honey mustard dip or a tangy barbecue sauce. For sides, think crisp green salads, roasted veggies, or sweet potato fries.
If you have leftovers, store them in an airtight container in the fridge for up to 3 days. To reheat, pop them in a preheated oven at 375°F (190°C) for 8-10 minutes or until warmed through and crispy again. Avoid microwaving if you want to keep the crunch!
Flavors tend to mellow and the crust softens a bit after refrigeration, but reheating in the oven or air fryer brings back a lot of that crisp texture. These tenders also freeze well—just flash freeze on a tray, then transfer to a freezer bag. Reheat straight from frozen with a few extra minutes in the oven.
Nutritional Information & Benefits
Per serving (about 4 tenders): approximately 280 calories, 18g protein, 12g fat, and 15g carbohydrates.
The almond meal adds healthy fats and a boost of vitamin E and magnesium, while rice flour offers a light, gluten-free carb source. Chicken tenderloins are lean and packed with protein, making this recipe a balanced choice for a wholesome meal.
This recipe is naturally gluten-free and dairy-free if you choose a plant-based milk, making it suitable for many dietary needs. It avoids heavy breading and frying in excessive oil, which keeps the calorie count reasonable without sacrificing flavor or crunch.
Conclusion
These crispy gluten-free chicken tenders are the kind of recipe that sticks with you—simple, satisfying, and just a little bit special. Whether you’re juggling busy schedules, feeding picky eaters, or just craving a crunchy comfort food fix, this recipe is a reliable winner.
Don’t hesitate to tweak the spices or coating to match your taste buds. I love how adaptable it is, and I’m pretty sure you’ll find your own favorite spin in no time. This recipe proves you don’t have to compromise texture or flavor just because you’re avoiding gluten.
Give it a try, and I’d love to hear your thoughts or any creative twists you come up with. Cooking should be fun and forgiving—and these tenders are just that. Here’s to crunchy, wholesome meals made easy!
FAQs
Can I bake these chicken tenders instead of frying?
Yes! Bake at 425°F (220°C) for about 20-22 minutes, flipping halfway through, for a crispy result with less oil.
What can I use instead of almond meal for a nut-free option?
Extra rice flour or gluten-free cornmeal works great to keep the crunch without nuts.
Are these tenders suitable for meal prep?
Absolutely. Store in the fridge for up to 3 days and reheat in the oven or air fryer to keep them crispy.
Can I use chicken breasts instead of tenders?
Yes, just slice chicken breasts into strips about the size of tenders for even cooking.
How do I keep the coating from falling off?
Pat the chicken dry before coating, use a double-dip method (wet then dry twice), and let the coating set for a minute before cooking.
Pin This Recipe!
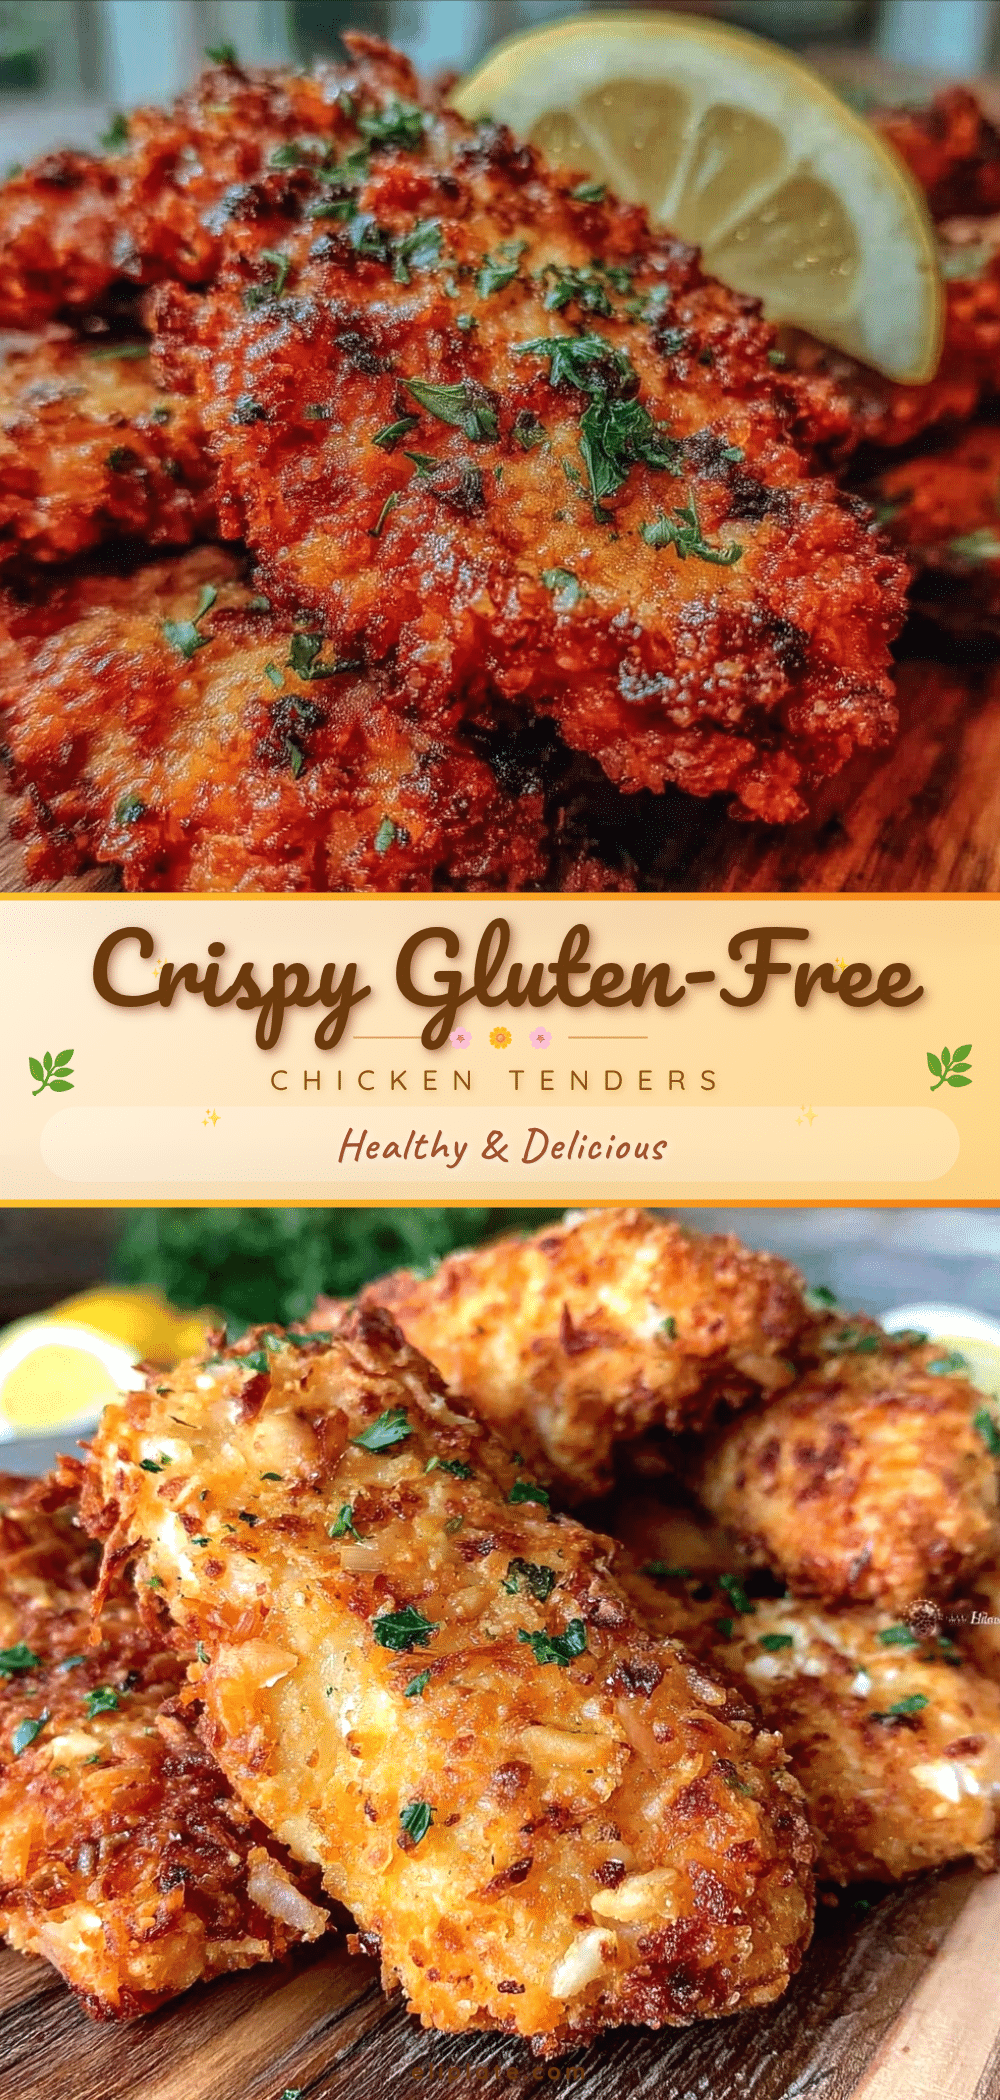
Crispy Gluten-Free Chicken Tenders Easy Recipe for Wholesome Crunch

A quick and easy gluten-free chicken tender recipe featuring a double coating of rice flour and almond meal for a perfectly crispy, wholesome crunch. Ideal for busy weeknights and family meals.
- Prep Time: 10 minutes
- Cook Time: 15 minutes
- Total Time: 25 minutes
- Yield: 4 servings 1x
- Category: Main Course
- Cuisine: American
Ingredients
- 1 pound (450g) fresh boneless, skinless chicken tenderloins
- ½ cup (60g) rice flour
- ½ cup (50g) almond meal
- 2 large eggs, beaten
- ¼ cup (60ml) unsweetened almond milk
- ½ cup (50g) panko-style gluten-free breadcrumbs (optional)
- 1 teaspoon smoked paprika
- 1 teaspoon garlic powder
- ½ teaspoon onion powder
- Salt and pepper to taste
- Olive oil or avocado oil for frying or baking
Instructions
- Pat the chicken tenders dry with paper towels and trim to similar thickness if needed (5 minutes).
- In a shallow bowl, combine rice flour, almond meal, gluten-free breadcrumbs (if using), smoked paprika, garlic powder, onion powder, salt, and pepper; stir until evenly mixed (3 minutes).
- In another bowl, whisk together the eggs and almond milk until smooth (2 minutes).
- Dip each chicken tender first into the wet mixture, letting excess drip off, then dredge thoroughly in the dry mixture. Repeat the wet then dry coating step once more for extra crunch. Place coated tenders on a plate (10 minutes).
- Heat 2 tablespoons of oil in a skillet over medium heat. Add tenders in a single layer and cook for 3-4 minutes per side until golden brown and cooked through (internal temperature 165°F / 74°C) (15 minutes).
- Transfer cooked tenders to a wire rack set over a baking sheet to drain excess oil and keep crispy. Let rest for a few minutes before serving (2 minutes).
Notes
Pat chicken dry before coating to help the coating stick. Use medium heat to avoid burning the coating. Double-coating creates extra crunch. Rest tenders on a wire rack instead of paper towels to keep them crispy. For baking, spray tenders lightly with oil and flip halfway through cooking. Air fryer option: 400°F (200°C) for 10-12 minutes, flipping halfway.
Nutrition
- Serving Size: About 4 chicken tend
- Calories: 280
- Fat: 12
- Carbohydrates: 15
- Protein: 18
Keywords: gluten-free chicken tenders, crispy chicken tenders, gluten-free recipe, almond meal chicken, quick chicken dinner, kid-friendly chicken, healthy chicken tenders