“You have to try this,” my friend insisted over text one rainy afternoon, sending me a blurry snapshot of what looked like a cross between a cheesecake and a tiramisu. Honestly, I was skeptical—tiramisu is one thing, cheesecake another, but espresso tiramisu cheesecake bars? It sounded like a dessert mashup that might just *try* too hard. Yet, after a few bites of these decadent espresso tiramisu cheesecake bars, I couldn’t stop thinking about them for days. The creamy, coffee-infused filling paired with a buttery crust somehow felt like a hug in dessert form. It was an unexpected shortcut to sophisticated flavor, the kind of recipe you stumble upon when you’re craving something indulgent but don’t want to wrestle with a complicated dessert.
Making these bars became my little obsession. I found myself tweaking the espresso strength, adjusting the sugar just a touch, and even swapping mascarpone for cream cheese to get that perfect balance of texture and tang. What struck me most was how this recipe captures the essence of a classic tiramisu, but in a handheld, sliceable form that’s perfect for sharing—or not. The espresso aroma wafts through your kitchen like a cozy invitation, and the layered textures keep you hooked from the first forkful to the last crumb.
And here’s the quiet truth: this recipe stuck with me because it’s an elegant dessert that doesn’t need to be fussy or intimidating. It’s a sweet little secret for dessert lovers who want that rich coffee kick and creamy indulgence, without spending hours in the kitchen. It’s the kind of treat that feels special but comes together with surprising ease, making you quietly confident in your dessert game every time.
Why You’ll Love This Recipe
Having spent quite some time perfecting these espresso tiramisu cheesecake bars, I can tell you they’re a dessert worth making over and over. Here’s why they’ve won a permanent spot in my baking rotation:
- Quick & Easy: The whole recipe comes together in about 45 minutes, plus chilling time—ideal for busy weeknights or when last-minute guests pop in.
- Simple Ingredients: You don’t need a specialized pantry. Most ingredients like cream cheese, espresso, and ladyfingers are staples or easily found at any grocery store.
- Perfect for Any Occasion: Whether it’s a cozy night in or a casual gathering, these bars bring that perfect blend of coffee and creaminess that impresses without stress.
- Crowd-Pleaser: Kids might not get the espresso kick, but adults consistently rave about the balance of flavors and textures.
- Unbelievably Delicious: The marriage of creamy cheesecake and espresso-soaked layers is comfort food with a little grown-up flair.
What makes this recipe stand out is the way it balances bold espresso flavor without overpowering the delicate creaminess of the cheesecake filling. Plus, using ladyfinger crumbs in the crust adds a subtle nod to the classic tiramisu texture that’s just irresistible. Honestly, it’s one of those desserts that makes you close your eyes after the first bite, savoring every nuance of flavor.
It’s not just a dessert; it’s a little celebration in bar form—easy to make, easier to share, and perfect for those moments when you want to treat yourself with something that tastes like a fancy café delight but made in your own kitchen. If you’re a fan of coffee desserts or cheesecake classics, this is the sweet spot where both worlds meet.
What Ingredients You Will Need
This recipe uses simple, wholesome ingredients to deliver bold flavor and satisfying texture without the fuss. Most are pantry staples, and substitutions are easy if you want to tweak things your way.
- For the Crust:
- 1 ½ cups ladyfinger cookies, crushed (or use graham cracker crumbs as a fallback)
- 6 tablespoons unsalted butter, melted (adds richness and holds the crust together)
- 2 tablespoons granulated sugar (balances the buttery crust)
- For the Espresso Soak:
- ½ cup strong brewed espresso, cooled (I recommend fresh espresso or a quality instant espresso powder for best flavor)
- 2 tablespoons coffee liqueur (optional, but adds an authentic tiramisu touch)
- For the Cheesecake Filling:
- 16 ounces cream cheese, softened (full-fat for creaminess; I like Philadelphia brand)
- ½ cup granulated sugar
- 2 large eggs, room temperature
- 1 teaspoon pure vanilla extract
- ½ cup mascarpone cheese (optional but recommended for silky texture)
- 1 tablespoon all-purpose flour (helps stabilize the cheesecake)
- For the Topping:
- Unsweetened cocoa powder, for dusting
- Chocolate shavings or espresso beans (optional garnish)
Feel free to swap mascarpone with extra cream cheese if you don’t have it on hand, though mascarpone adds that signature softness. For a gluten-free crust, almond flour mixed with crushed gluten-free cookies works beautifully. You can also adjust the espresso intensity by adding more or less to the soak, depending on your love for coffee’s punch.
Equipment Needed
- 8×8-inch square baking pan (preferably non-stick or lined with parchment paper for easy removal)
- Medium mixing bowls
- Electric mixer or stand mixer (handheld mixers work fine too)
- Measuring cups and spoons
- Fine mesh sieve (for dusting cocoa powder evenly)
- Spatula or rubber scraper
- Fork or food processor (to crush ladyfingers if not pre-crumbled)
If you don’t have a stand mixer, a sturdy handheld mixer will do just fine for whipping the cream cheese filling smooth. A food processor makes crushing the ladyfingers quick, but you can put them in a zip-top bag and use a rolling pin to crush if you want to keep things simple and budget-friendly. Lining your pan with parchment paper makes lifting out the bars easier and keeps those edges neat.
Preparation Method

- Preheat your oven to 325°F (160°C). Line an 8×8-inch pan with parchment paper, leaving some overhang on the sides for easy removal later.
- Prepare the crust: Place the crushed ladyfinger cookies in a medium bowl. Add melted butter and 2 tablespoons sugar, then mix until the crumbs are evenly coated and look like wet sand. Press the crumb mixture firmly and evenly into the bottom of the prepared pan using the back of a spoon or your fingers. Bake for about 10 minutes until set and fragrant. Remove from oven and let cool slightly.
- Make the espresso soak: In a shallow dish, combine the cooled espresso and coffee liqueur (if using). Set aside for dipping later.
- Prepare cheesecake filling: Using an electric mixer, beat the softened cream cheese on medium speed until smooth and creamy, about 2-3 minutes. Add sugar and continue beating until fully combined.
- Incorporate eggs one at a time, mixing well after each addition. Blend in vanilla extract and mascarpone cheese (if using). Add the flour and mix on low speed just until blended. Avoid overmixing to prevent cracks during baking.
- Assemble: Pour half of the cheesecake filling over the baked crust and spread evenly. Quickly dip each ladyfinger into the espresso soak (just a quick dip — don’t let them get soggy), then arrange a layer of dipped ladyfingers over the cheesecake layer.
- Spread the remaining cheesecake filling over the ladyfinger layer, smoothing the top with a spatula.
- Bake for 40-45 minutes, or until the edges are set but the center still has a slight jiggle. Don’t overbake; the cheesecake will continue to firm up as it cools.
- Cool completely at room temperature for 1 hour, then refrigerate for at least 4 hours or overnight for best texture and flavor melding.
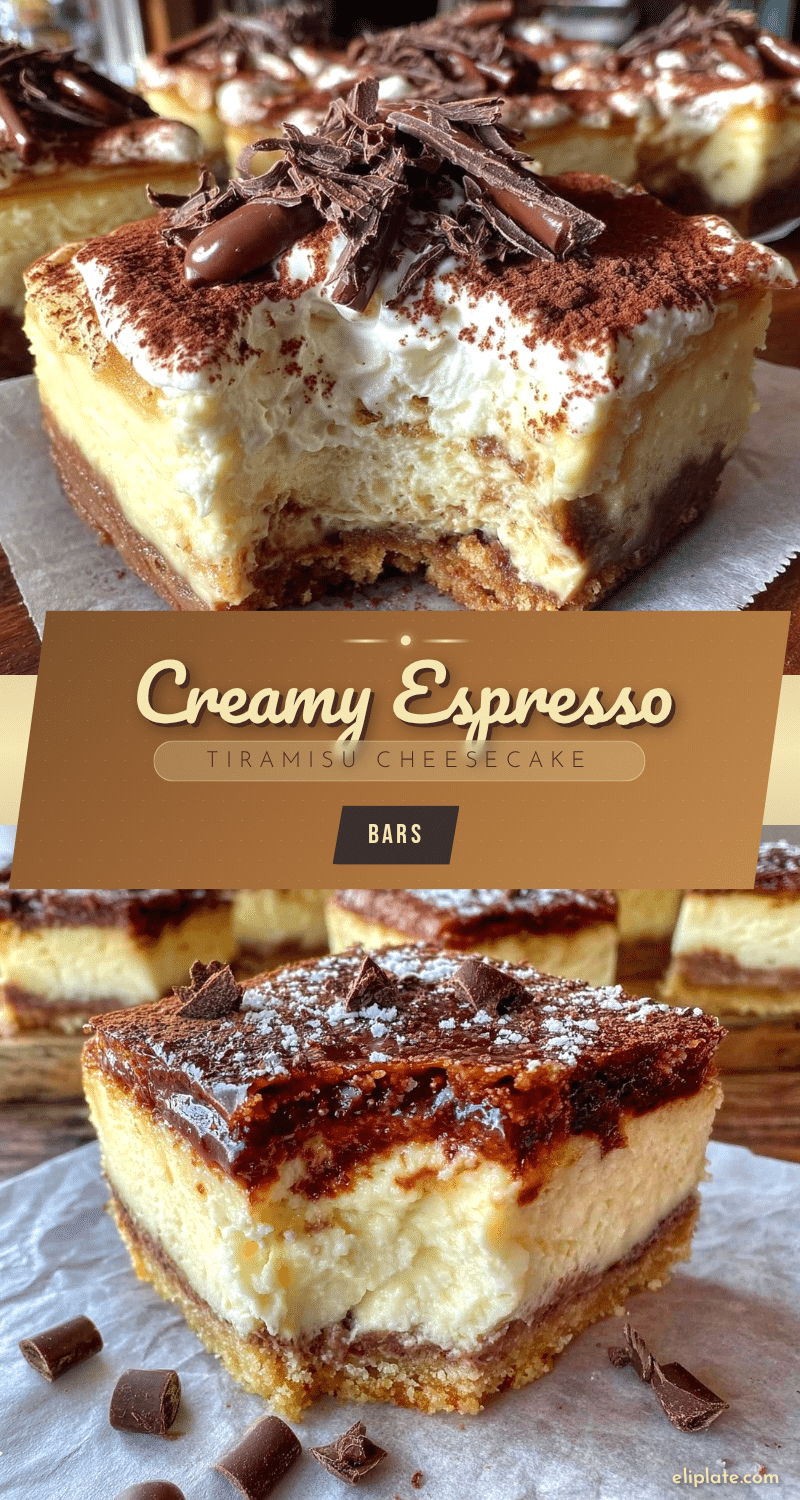
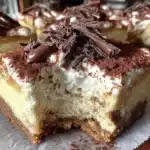
- Before serving, dust the top generously with unsweetened cocoa powder using a fine sieve. Garnish with chocolate shavings or espresso beans if desired. Cut into bars and enjoy the rich layers of espresso tiramisu cheesecake bliss.
Pro tip: If cracking forms on top, don’t panic — gently cover with cocoa powder or chocolate shavings to mask it. The flavor won’t be affected.
Cooking Tips & Techniques
Getting these espresso tiramisu cheesecake bars just right takes a little finesse, but nothing too tricky. Here are some tips I’ve picked up the hard way:
- Softened cream cheese is key: Cold cream cheese will give you lumpy filling. Let it sit at room temperature for at least 30 minutes before mixing.
- Don’t overmix the batter: Once the eggs go in, mix just enough to combine. Overmixing can incorporate too much air, causing cracks or a dry texture.
- Espresso soak timing: Dip ladyfingers quickly — about 1 second per side. If you let them soak too long, the bars will get soggy and fall apart.
- Baking temperature: A lower temperature helps prevent cracking and keeps the cheesecake silky smooth.
- Use a water bath if you want: For extra creamy bars, you can place the baking pan in a larger pan filled halfway with hot water. This prevents drying out but isn’t mandatory.
- Chill thoroughly: Don’t rush serving. The bars firm up beautifully after several hours in the fridge, making slicing cleaner and flavors more developed.
One time I forgot to soften the cream cheese and ended up with a lumpy disaster—lesson learned! Also, dipping the ladyfingers too long the first time made my bars soggy, so keep that step quick and confident. The cocoa powder dusting isn’t just for looks; it adds that bittersweet finish that balances the richness perfectly.
Variations & Adaptations
These espresso tiramisu cheesecake bars are surprisingly adaptable. Here are a few ways to make the recipe your own:
- Non-alcoholic version: Skip the coffee liqueur and use extra espresso or strong coffee for the soak. You can add a splash of vanilla or almond extract for a flavor twist.
- Gluten-free crust: Replace ladyfinger crumbs with almond flour combined with crushed gluten-free cookies. The texture is slightly different but still delicious.
- Chocolate lovers: Stir in ½ cup mini chocolate chips or swirl in some melted bittersweet chocolate into the cheesecake layer before baking.
- Vegan adaptation: Use dairy-free cream cheese and mascarpone alternatives, substitute eggs with flax eggs (1 tablespoon ground flaxseed + 3 tablespoons water per egg), and use vegan ladyfingers or gluten-free cookies for the crust.
- Seasonal twist: Add a sprinkle of cinnamon or nutmeg to the crust or filling for a cozy fall vibe. Or try adding a hint of orange zest for a bright contrast to the espresso.
I once made a batch with a dark chocolate crust using crushed chocolate wafer cookies, which gave the bars a deeper, richer base. It was a hit at a potluck! Feel free to play around with your favorite flavors and textures. If you love desserts like the rich peanut butter bars from this site, you’ll find these tiramisu cheesecake bars just as satisfying in their own coffee-soaked way.
Serving & Storage Suggestions
These espresso tiramisu cheesecake bars are best served chilled, straight from the fridge. The firm, creamy texture holds up well for easy slicing and elegant presentation. For a special touch, dust extra cocoa powder just before serving or add a few chocolate shavings on top.
Pair these bars with a cup of freshly brewed coffee or a glass of cold milk to complement the espresso flavor. They also make a wonderful dessert after a hearty meal, balancing richness with a bittersweet coffee kick.
To store, cover the bars tightly with plastic wrap or an airtight container and refrigerate for up to 4 days. They keep well and actually taste better after a day or two as the flavors meld. You can freeze the bars for up to one month—wrap individual slices in plastic wrap and place in a freezer-safe container. Thaw overnight in the fridge before serving.
Reheating isn’t really recommended, but if you want them slightly softer, leave the bars out at room temperature for 15-20 minutes before enjoying. Just remember, the creamy texture is best when cold and firm.
If you’re interested in other dessert bars that hold up well for gatherings, you might appreciate the simplicity of the classic peanut butter bars on this site, which also balance nostalgic flavors with easy prep.
Nutritional Information & Benefits
Each serving of these espresso tiramisu cheesecake bars (assuming 16 bars from the recipe) contains approximately:
| Calories | 220 |
|---|---|
| Fat | 15g |
| Carbohydrates | 18g |
| Protein | 4g |
| Sugar | 12g |
The cream cheese and mascarpone provide a good amount of protein and calcium, while the espresso adds antioxidants without calories. The recipe is moderately high in fat, largely from the creamy cheeses and butter, which makes for that rich, satisfying mouthfeel.
If you’re watching carbs or sugar, you can reduce the amount of sugar or use a sugar substitute, and almond flour crust can reduce carbs significantly. This recipe is naturally gluten-free if you use gluten-free ladyfingers or an alternative crust.
From a wellness perspective, the espresso delivers a gentle caffeine boost and antioxidants, which many dessert lovers appreciate as a pick-me-up after dinner. Plus, making your own bars lets you control ingredient quality and avoid preservatives found in store-bought options.
Conclusion
These decadent espresso tiramisu cheesecake bars are a dream come true for dessert lovers who want sophistication without the fuss. They combine the best of creamy cheesecake and classic tiramisu in a portable, sliceable form that’s perfect for sharing—or sneaking a few pieces when no one’s watching.
The recipe invites you to tweak it your way, whether that’s dialing up the espresso, adding chocolate, or making it gluten-free. Personally, I love how the layers come together to create something that feels indulgent yet approachable. It’s my go-to when I want a dessert that’s both comforting and a little fancy without hours of work.
If you give these bars a try, I’d love to hear how you make them your own or what occasions you serve them for. Your feedback and adaptations always make this kitchen adventure even sweeter. Here’s to many delicious bites of espresso tiramisu bliss ahead!
FAQs About Decadent Espresso Tiramisu Cheesecake Bars
Can I use instant espresso powder instead of brewed espresso?
Yes! Dissolve 2 tablespoons of instant espresso powder in ½ cup hot water and let it cool before using for the soak. It works well and is a convenient shortcut.
How long should I chill the bars before serving?
At least 4 hours in the refrigerator is best, but overnight chilling gives the flavors time to meld and the texture to firm perfectly.
Can I make these bars ahead of time for a party?
Absolutely. They keep well refrigerated for up to 4 days and can be frozen up to a month. Just thaw overnight in the fridge before serving.
What if I don’t have mascarpone cheese?
You can substitute with an equal amount of cream cheese for a slightly firmer texture, though mascarpone gives a silkier mouthfeel closer to classic tiramisu.
How do I prevent cracks on top of the cheesecake bars?
Don’t overmix the batter and avoid overbaking. Lower oven temperatures and using a water bath can also help keep the texture smooth and crack-free.
Pin This Recipe!
Decadent Espresso Tiramisu Cheesecake Bars
These espresso tiramisu cheesecake bars combine creamy cheesecake and classic tiramisu flavors in a handheld, sliceable dessert that’s quick and easy to make. Perfect for dessert lovers craving a rich coffee kick without complicated preparation.
- Prep Time: 15 minutes
- Cook Time: 50 minutes
- Total Time: 5 hours 5 minutes
- Yield: 16 bars 1x
- Category: Dessert
- Cuisine: Italian-American
Ingredients
- 1 ½ cups ladyfinger cookies, crushed (or graham cracker crumbs as a fallback)
- 6 tablespoons unsalted butter, melted
- 2 tablespoons granulated sugar
- ½ cup strong brewed espresso, cooled (or 2 tablespoons instant espresso powder dissolved in ½ cup hot water)
- 2 tablespoons coffee liqueur (optional)
- 16 ounces cream cheese, softened (full-fat)
- ½ cup granulated sugar
- 2 large eggs, room temperature
- 1 teaspoon pure vanilla extract
- ½ cup mascarpone cheese (optional)
- 1 tablespoon all-purpose flour
- Unsweetened cocoa powder, for dusting
- Chocolate shavings or espresso beans (optional garnish)
Instructions
- Preheat your oven to 325°F (160°C). Line an 8×8-inch pan with parchment paper, leaving some overhang for easy removal.
- Prepare the crust: Mix crushed ladyfinger cookies, melted butter, and 2 tablespoons sugar until evenly coated. Press firmly into the bottom of the pan. Bake for 10 minutes until set and fragrant. Let cool slightly.
- Make the espresso soak: Combine cooled espresso and coffee liqueur in a shallow dish. Set aside.
- Prepare cheesecake filling: Beat softened cream cheese on medium speed until smooth (2-3 minutes). Add sugar and beat until combined.
- Add eggs one at a time, mixing well after each. Blend in vanilla extract and mascarpone (if using). Add flour and mix on low speed just until blended. Avoid overmixing.
- Assemble: Pour half the cheesecake filling over the crust and spread evenly. Quickly dip ladyfingers into espresso soak (about 1 second per side) and arrange a layer over the filling.
- Spread remaining cheesecake filling over the ladyfinger layer and smooth the top.
- Bake for 40-45 minutes until edges are set but center slightly jiggles. Do not overbake.
- Cool at room temperature for 1 hour, then refrigerate at least 4 hours or overnight.
- Before serving, dust with cocoa powder and garnish with chocolate shavings or espresso beans if desired. Cut into bars and serve.
Notes
Use softened cream cheese for smooth filling. Dip ladyfingers quickly to avoid sogginess. Avoid overmixing batter to prevent cracks. A water bath can be used for extra creamy texture but is optional. Chill bars thoroughly for best texture and flavor. Substitute mascarpone with cream cheese if unavailable. For gluten-free crust, use almond flour and gluten-free cookies. Instant espresso powder can replace brewed espresso.
Nutrition
- Serving Size: 1 bar
- Calories: 220
- Sugar: 12
- Fat: 15
- Carbohydrates: 18
- Protein: 4
Keywords: espresso tiramisu, cheesecake bars, coffee dessert, easy tiramisu, no-bake cheesecake, tiramisu bars, dessert bars, coffee cheesecake