“Try these little cheesecake bites—they’re so creamy, you won’t believe they didn’t bake!” That’s what my friend Lisa said last summer during an unplanned backyard hangout. I was skeptical at first—honestly, no-bake desserts always seemed like a bit of a cheat to me. But as soon as I popped one of these creamy no-bake cheesecake bites with fresh fruit topping into my mouth, I understood the fuss.
It all started with a rushed afternoon where I wanted something sweet but didn’t want to turn on the oven in the summer heat. I rummaged through the fridge and pantry, throwing together cream cheese, a bit of sugar, and graham crackers, figuring it’d be a quick fix. What happened next surprised me: the texture was silky smooth, lighter than I expected, with a fresh tang from the fruit topping that balanced the sweetness perfectly. Since then, I’ve made these bites so often that my freezer always has a batch waiting for a sweet craving or a quick dessert after dinner.
What really sticks with me about this recipe is how it blends simplicity and indulgence without that usual post-dessert heaviness. It’s the kind of treat that feels like a little celebration, but without the fuss or the guilt. If you’re ever in the mood for a dessert that’s fuss-free but still gets those “wow” reactions, these cheesecake bites might just become your go-to.
Why You’ll Love This Recipe
After testing this recipe multiple times in my kitchen (plus a few tweaks here and there), I can say these cheesecake bites have a spot in my dessert hall of fame. Here’s why you might find yourself making these again and again:
- Quick & Easy: Ready in under 30 minutes, perfect for those spontaneous sweet tooth moments or last-minute guests.
- Simple Ingredients: No complicated or exotic ingredients—just basics like cream cheese, graham crackers, and fresh fruit.
- Great for Any Occasion: Whether it’s a casual brunch, a summer barbecue, or a cozy night in, these bites fit right in.
- Crowd-Pleaser: Both kids and adults can’t resist them. I’ve had friends ask for the recipe at least twice after trying them.
- Unbelievably Delicious: The creamy texture and fresh fruit topping make every bite feel like a mini dessert escape.
This isn’t just any no-bake cheesecake bite recipe. I found that folding a tiny bit of whipped cream into the cream cheese mixture gives these bites a cloud-like softness that sets them apart. Plus, the fresh fruit topping isn’t just decoration—it adds a burst of natural sweetness and a little zing that balances the richness beautifully.
Honestly, it’s a recipe that makes you close your eyes after the first bite and savor the moment. And if you want a dessert that’s both comforting and light, with minimal prep, you’ve just found one.
What Ingredients You Will Need
This recipe uses simple, wholesome ingredients to deliver bold flavor and satisfying texture without the fuss. Most of these are pantry staples or fresh produce you can easily find or swap according to the season.
- Cream Cheese, softened (I prefer Philadelphia for its smooth texture)
- Heavy Whipping Cream or whipping cream (adds lightness and creaminess)
- Powdered Sugar (for smooth sweetness without graininess)
- Vanilla Extract (pure, not imitation, for the best flavor)
- Graham Cracker Crumbs (for the base, use store-bought or homemade by crushing crackers)
- Unsalted Butter, melted (binds the crust together; can swap for coconut oil if needed)
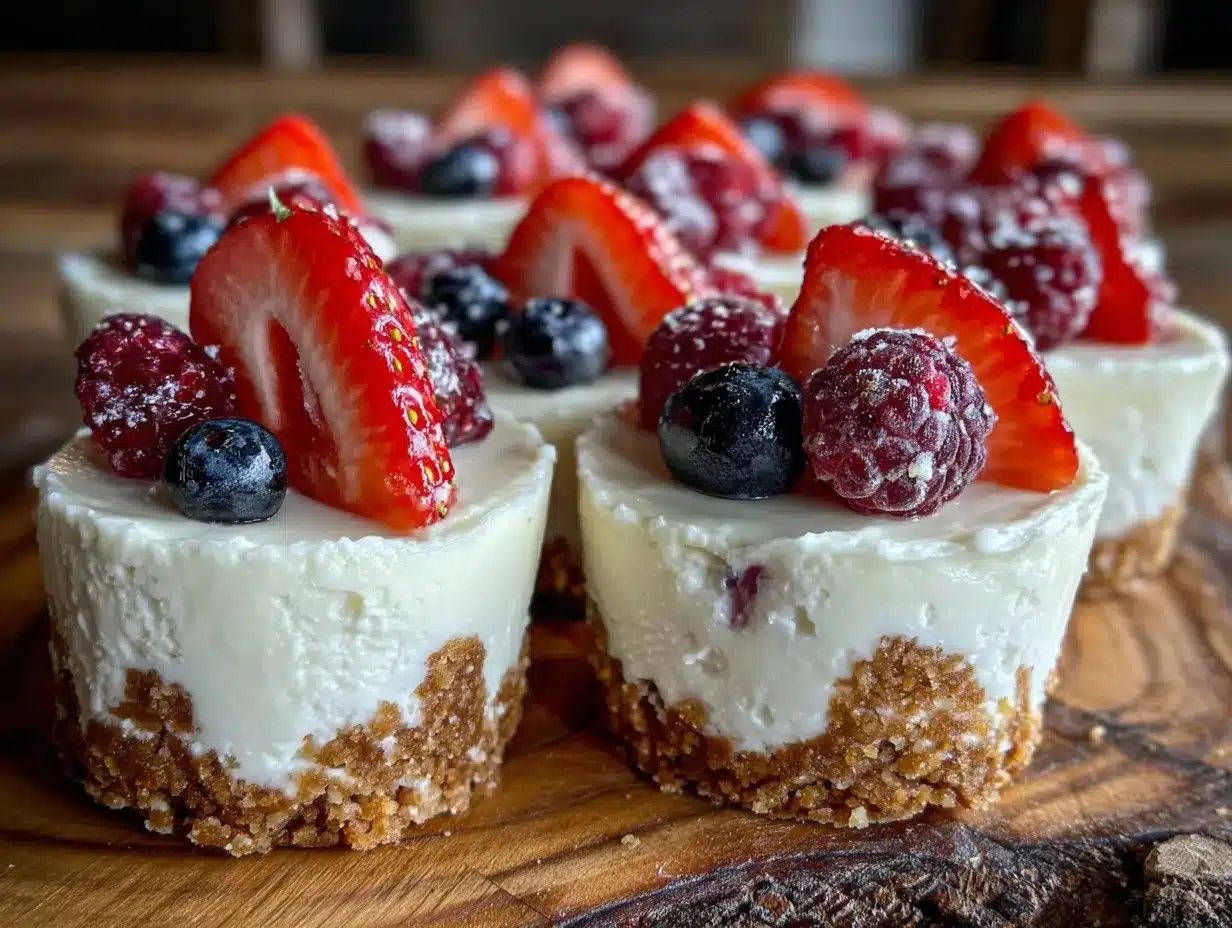
- Fresh Fruit Topping – I usually go with a mix of strawberries, blueberries, and kiwi for color and flavor contrast
- Lemon Zest (optional, adds a refreshing brightness)
Substitution tips: If you want a gluten-free base, almond flour or gluten-free graham crackers work well instead of regular graham cracker crumbs. For dairy-free versions, swap cream cheese with a plant-based alternative and use coconut cream instead of heavy cream.
In summer, I love swapping fresh berries for stone fruits like peaches or nectarines, which add a juicy sweetness that complements the creamy cheesecake perfectly.
Equipment Needed
- Mixing bowls (one large for the cheesecake batter, one smaller for whipping cream)
- Electric hand mixer or stand mixer (for whipping cream and smooth batter)
- Measuring cups and spoons (accuracy helps keep the texture right)
- Mini muffin tin or silicone molds (for shaping the cheesecake bites)
- Spatula (for folding the whipped cream gently)
- Food processor or rolling pin (to crush graham crackers into crumbs)
- Refrigerator space (to chill and set the bites)
If you don’t have a mixer, whisking by hand is possible but expect more elbow grease! Silicone molds are my personal favorite for easy removal, but a mini muffin tin lined with parchment paper works just as well. Keeping your mixing bowls and beaters chilled helps the cream whip faster and stay stable, a little trick I learned the hard way after a few too-soft batches.
Preparation Method
- Prepare the crust: Start by crushing 1 1/2 cups (150g) of graham cracker crumbs until fine. You can do this in a food processor or by placing crackers in a plastic bag and rolling them with a rolling pin. Mix the crumbs with 6 tablespoons (85g) of melted unsalted butter until the mixture feels like wet sand.
- Form the base: Press the crumb mixture firmly into the bottom of a mini muffin tin or silicone molds, about 1 tablespoon per cavity. Use the back of a spoon to compact the crust evenly. Place the tin in the fridge while you prepare the filling. (Chilling the base helps it hold together better.)
- Make the cheesecake filling: In a large bowl, beat 8 ounces (225g) of softened cream cheese with 1/3 cup (40g) powdered sugar and 1 teaspoon vanilla extract until smooth and creamy—no lumps! This usually takes about 2-3 minutes with an electric mixer.
- Whip the cream: In a separate chilled bowl, whip 1 cup (240ml) heavy whipping cream until stiff peaks form. This step is key for that airy, creamy texture.
- Fold the whipped cream: Gently fold the whipped cream into the cream cheese mixture using a spatula. Do this slowly so you don’t lose the fluffiness. The filling should be light and smooth, almost cloud-like.
- Fill the molds: Spoon the cheesecake filling over the chilled crusts, filling each cavity almost to the top. Smooth the surface with the back of a spoon or an offset spatula.
- Chill to set: Refrigerate the cheesecake bites for at least 4 hours, or ideally overnight. This allows them to firm up and develop flavor.
- Add the fruit topping: Just before serving, top each bite with fresh fruit slices or berries and a sprinkle of lemon zest if you like a little zing. This fresh topping brings color and brightness that contrasts the creamy base perfectly.
Tip: If you want to save time, you can prepare the crust and filling a day ahead, then add the fruit topping right before serving. Also, if the filling feels too soft after chilling, a quick 30-minute stint in the freezer firms them right up without freezing solid.
Cooking Tips & Techniques
Getting the texture just right is the trickiest part of no-bake cheesecakes, but with a few kitchen secrets, it gets easier every time.
- Softened cream cheese is essential: If it’s too cold, lumps will form. I usually take mine out 30 minutes before starting or soften it in short bursts in the microwave (just a few seconds at a time).
- Whip cream properly: Make sure your bowl and beaters are cold, and whip until stiff peaks form. Under-whipped cream won’t hold the structure, but over-whipped cream can turn grainy.
- Gentle folding: When mixing whipped cream into cream cheese, fold carefully to keep the airiness. Use a spatula and scoop from the bottom up rather than stirring vigorously.
- Press crust firmly: Compacting the graham cracker base well helps prevent crumbling when you bite in. I sometimes use a small glass to press down evenly.
- Patience with chilling: No shortcuts here! The cheesecake bites need time to firm up or they’ll be too soft to handle.
Years ago, I made these with a rushed chill time, and the filling was runny and disappointing. Lesson learned: patience really pays off. I also like to prep these as part of a dessert spread alongside something savory like a keto stuffed peppers recipe—it balances the meal wonderfully.
Variations & Adaptations
One of the best things about this recipe is how easy it is to tweak based on what you’re craving or have on hand.
- Dietary swaps: For a dairy-free version, swap cream cheese for a vegan alternative and use coconut cream instead of heavy cream. Use gluten-free graham crackers or almond flour for the crust.
- Flavor twists: Add a swirl of chocolate ganache or peanut butter into the filling before chilling for a richer dessert. I once tried a lemon curd layer that gave a bright tartness that paired beautifully with blueberries on top.
- Seasonal fruits: Fresh mango, raspberries, or pomegranate seeds work great as toppings, adjusting to what’s freshest or local. In winter, a warmed berry compote is a cozy alternative.
- Size & presentation: Make them larger in a springform pan for a classic no-bake cheesecake or freeze the filling in silicone molds for bite-sized frozen treats.
Personally, I enjoy trying these bites with a drizzle of honey and crushed pistachios on top, especially when entertaining. It adds a little crunch and unexpected sweetness without overpowering the creamy base. If you want to see a similar creamy dessert with a cozy twist, you might like the creamy one-pot chicken pasta for dinner before these bites as a treat.
Serving & Storage Suggestions
These cheesecake bites are best served chilled, straight from the fridge. The cold temperature keeps the texture firm but creamy, and the fresh fruit topping tastes brightest when fresh and cool.
For presentation, I like to arrange them on a pretty platter with a few whole berries and mint leaves scattered around—it makes for a visually inviting dessert centerpiece. They also pair wonderfully with a cup of freshly brewed coffee or a light sparkling wine if you’re celebrating.
Storage is straightforward: keep them covered in the refrigerator for up to 4 days. If you want to keep them longer, freeze the bites (without the fruit topping) in an airtight container for up to 2 months. Thaw overnight in the fridge before serving, then add fresh fruit on top.
Reheating isn’t really recommended since the texture is best cold, but letting them sit out for 10 minutes before eating softens them slightly for easier bites.
Trust me, these treats taste even better after a day or two when the flavors have melded a bit. I always make a double batch so I have some ready for the week—no regrets!
Nutritional Information & Benefits
Each creamy no-bake cheesecake bite contains roughly 120-150 calories depending on the size and toppings. They’re a moderate source of protein thanks to the cream cheese and have a satisfying fat content that keeps you feeling full.
The fresh fruit topping adds natural vitamins, antioxidants, and fiber, making this dessert not just indulgent but a bit of a nutritional win compared to many sugary treats.
For those watching carbs, swapping traditional graham crackers for almond flour crust or using a sugar substitute in the filling can make this recipe low-carb friendly. Just be mindful of any potential allergens like nuts or dairy if serving guests.
From a wellness perspective, I appreciate how this dessert balances indulgence with fresh, real ingredients. It’s not about deprivation but finding joy in simple, wholesome flavors that satisfy cravings without overdoing it.
Conclusion
If you’re after a dessert that feels special but doesn’t require hours in the kitchen or complicated ingredients, these creamy no-bake cheesecake bites with fresh fruit topping are a no-brainer. They’re flexible enough to adapt to your pantry, diet, and mood, and reliably delicious every time.
This recipe has stuck with me because it’s honest food—comforting, fresh, and just a little fancy without the fuss. Whether you’re treating yourself after a long day or serving guests who expect something memorable, these cheesecake bites deliver.
I’d love to hear how you make them your own, so don’t hesitate to share your twists or favorite toppings in the comments. Here’s to many creamy, sweet moments ahead!
Frequently Asked Questions
Can I make these cheesecake bites ahead of time?
Absolutely! They can be made up to 2 days in advance and stored in the refrigerator. Just add the fresh fruit topping right before serving for best results.
What can I use if I don’t have graham crackers?
You can substitute crushed digestive biscuits, vanilla wafers, or even almond flour for a gluten-free option.
How long do cheesecake bites keep in the freezer?
Without the fruit topping, they can be frozen for up to 2 months. Thaw them in the fridge overnight before eating.
Can I use flavored cream cheese?
It’s best to stick with plain cream cheese for a balanced flavor, but small additions like lemon zest or vanilla extract can enhance the taste nicely.
What’s the best way to remove the bites from silicone molds?
Gently push from the bottom of each mold to pop them out. If stuck, briefly dip the mold in warm water (avoiding the cheesecake) to loosen them.
Pin This Recipe!
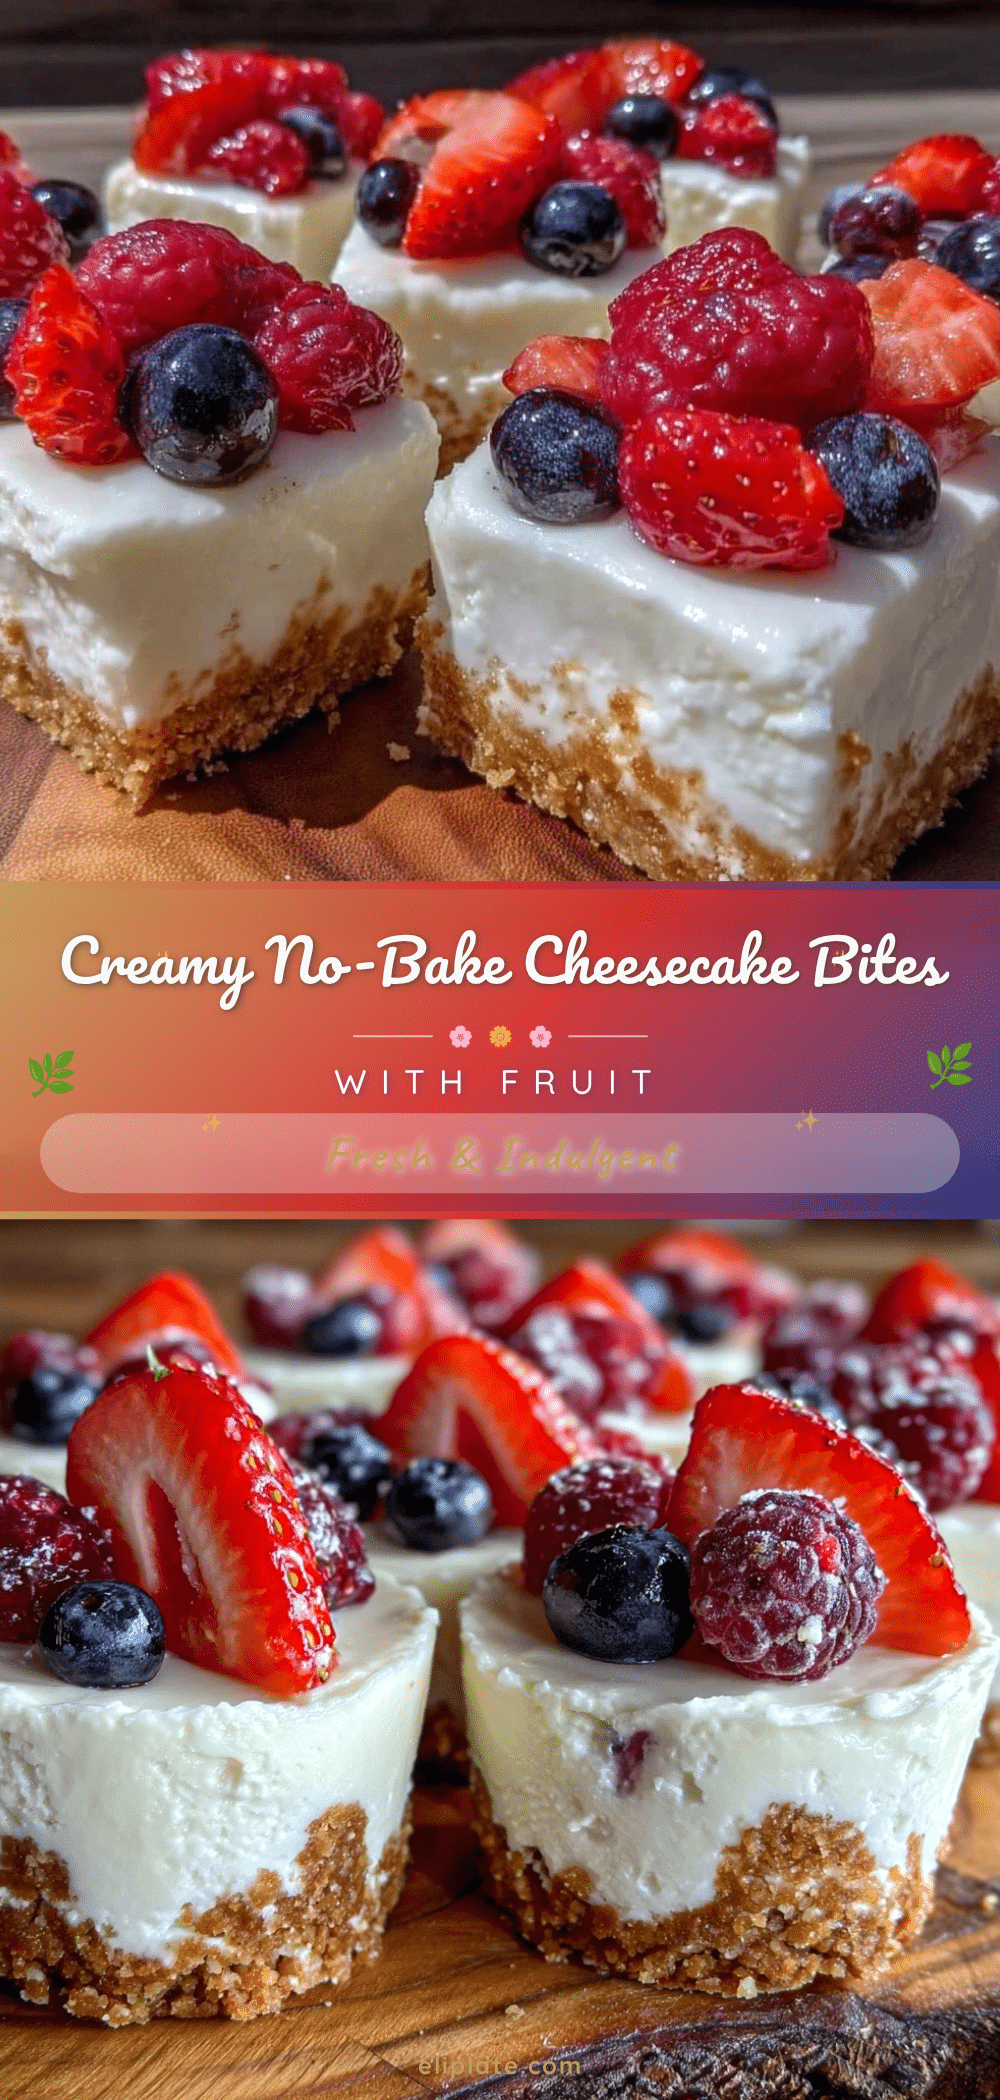
Creamy No-Bake Cheesecake Bites with Fresh Fruit Topping

These creamy no-bake cheesecake bites are a quick and easy homemade dessert featuring a silky smooth filling and fresh fruit topping, perfect for any occasion.
- Prep Time: 15 minutes
- Cook Time: 0 minutes
- Total Time: 4 hours 15 minutes
- Yield: 24 bites 1x
- Category: Dessert
- Cuisine: American
Ingredients
- 8 ounces (225g) cream cheese, softened
- 1 cup (240ml) heavy whipping cream
- 1/3 cup (40g) powdered sugar
- 1 teaspoon vanilla extract
- 1 1/2 cups (150g) graham cracker crumbs
- 6 tablespoons (85g) unsalted butter, melted
- Fresh fruit topping (strawberries, blueberries, kiwi, or seasonal fruits)
- Lemon zest (optional)
Instructions
- Crush 1 1/2 cups (150g) of graham cracker crumbs until fine using a food processor or rolling pin.
- Mix the crumbs with 6 tablespoons (85g) melted unsalted butter until the mixture feels like wet sand.
- Press the crumb mixture firmly into the bottom of a mini muffin tin or silicone molds, about 1 tablespoon per cavity. Compact evenly and chill in the fridge.
- In a large bowl, beat 8 ounces (225g) softened cream cheese with 1/3 cup (40g) powdered sugar and 1 teaspoon vanilla extract until smooth and creamy.
- In a separate chilled bowl, whip 1 cup (240ml) heavy whipping cream until stiff peaks form.
- Gently fold the whipped cream into the cream cheese mixture using a spatula, maintaining fluffiness.
- Spoon the cheesecake filling over the chilled crusts, filling each cavity almost to the top and smooth the surface.
- Refrigerate the cheesecake bites for at least 4 hours or overnight to set.
- Just before serving, top each bite with fresh fruit slices or berries and a sprinkle of lemon zest if desired.
Notes
Use softened cream cheese to avoid lumps. Whip cream until stiff peaks form for best texture. Fold whipped cream gently to keep airiness. Chill bites for at least 4 hours or overnight for best results. For gluten-free crust, substitute graham crackers with almond flour or gluten-free crackers. For dairy-free, use plant-based cream cheese and coconut cream.
Nutrition
- Serving Size: 1 bite
- Calories: 135
- Sugar: 6
- Sodium: 90
- Fat: 10
- Saturated Fat: 6
- Carbohydrates: 9
- Fiber: 1
- Protein: 3
Keywords: no-bake cheesecake, cheesecake bites, easy dessert, creamy cheesecake, fresh fruit topping, quick dessert, homemade dessert