“Hey, wanna try the best caramel apple slices ever?” That’s the text I got from my neighbor last fall, right as the chill settled in. Honestly, I’d never been much for the classic caramel apple on a stick — too sticky, too messy, and usually too sweet. But these caramel apple slices? They were a game changer. I remember sitting on my porch, the crisp fall air swirling leaves around my feet, peeling back that perfect caramel coating and biting into the crisp, tart apple underneath. It was like autumn had been captured in a snack.
Making caramel apple slices this way feels less like a chore and more like a cozy ritual. The caramel is smooth, not cloying, and the apple slices stay crisp, no sogginess here — which honestly surprised me the first time around. It wasn’t just a treat; it became my go-to snack during that season when I needed a little sweetness without the full sugar rush of a candy bar. Plus, the ease of slicing rather than dealing with whole apples on sticks? A total win for busy evenings or when unexpected guests drop by.
There’s something about the way the warm, buttery caramel drapes over the cold, crisp apple that just sticks with you. I’ve made these slices so many times this past autumn that my kitchen smelled like a little candy shop. And if you’re like me — someone who appreciates simple recipes that feel special without a ton of fuss — these caramel apple slices will probably sneak into your snack rotation too. No need to fuss with complicated candy thermometers or long cook times. Just a few ingredients, a little patience, and you’ll have a snack that feels both indulgent and comforting.
What really sold me? The subtle balance of sweet and tart, and how easy it was to make a batch that lasted for a few days (if you don’t eat them all at once). So if you’re craving something to match the vibe of crunchy leaves and cozy sweaters, these easy irresistible caramel apple slices might just become your autumn obsession.
Why You’ll Love This Recipe
Having tried a handful of caramel apple recipes over the years, I can tell you this one stands out for a bunch of reasons. After testing and tweaking, I finally landed on a method that works every time — smooth caramel that isn’t overly sweet and apple slices that stay crunchy without turning soggy. Here’s what makes these caramel apple slices special:
- Quick & Easy: Whip up a batch in under 30 minutes — perfect for those spontaneous snack cravings or last-minute fall gatherings.
- Simple Ingredients: No fancy candy-making skills or hard-to-find items. Just butter, brown sugar, cream, and good crisp apples.
- Perfect for Autumn Snacking: Ideal for nibbling during a brisk walk, at your desk, or even as a simple dessert after dinner.
- Crowd-Pleaser: Kids love them, adults ask for seconds, and they’re a hit at potlucks or casual get-togethers.
- Unbelievably Delicious: The smooth, buttery caramel with a hint of vanilla plays beautifully with the tart apple slices — a texture and flavor combo you’ll want to repeat.
What sets this recipe apart? Instead of dipping whole apples, slicing them first means every bite is easy and less messy. Plus, I use a gentle simmer method for the caramel, so it thickens just right without burning — a trick I picked up after a few sticky kitchen mishaps. And if you’re curious, I always reach for Granny Smith apples here. Their tartness cuts through the caramel sweetness perfectly and keeps that satisfying crunch.
Honestly, this isn’t just another caramel apple recipe; it’s the one you’ll want to make when you feel like snacking without the fuss. It’s like autumn in your mouth, without the caramel-coated stick drama.
What Ingredients You Will Need
This recipe uses straightforward ingredients that come together to create a bold flavor and satisfying texture without a lot of hassle. Most are pantry staples or easy to find at any grocery store during apple season. Here’s what you’ll want to have on hand:
- Apples: 3 large Granny Smith apples, washed and thinly sliced (about 1/4 inch thick) — their tartness balances the caramel beautifully.
- Unsalted butter: 6 tablespoons, softened (adds richness and creaminess to the caramel).
- Brown sugar: 3/4 cup packed (light or dark brown sugar both work, but dark gives a deeper flavor).
- Heavy cream: 1/4 cup (use full-fat for the best texture; can substitute with coconut cream for dairy-free).
- Vanilla extract: 1 teaspoon (for that warm, comforting note in the caramel).
- Salt: 1/4 teaspoon (balances the sweetness and enhances flavor).
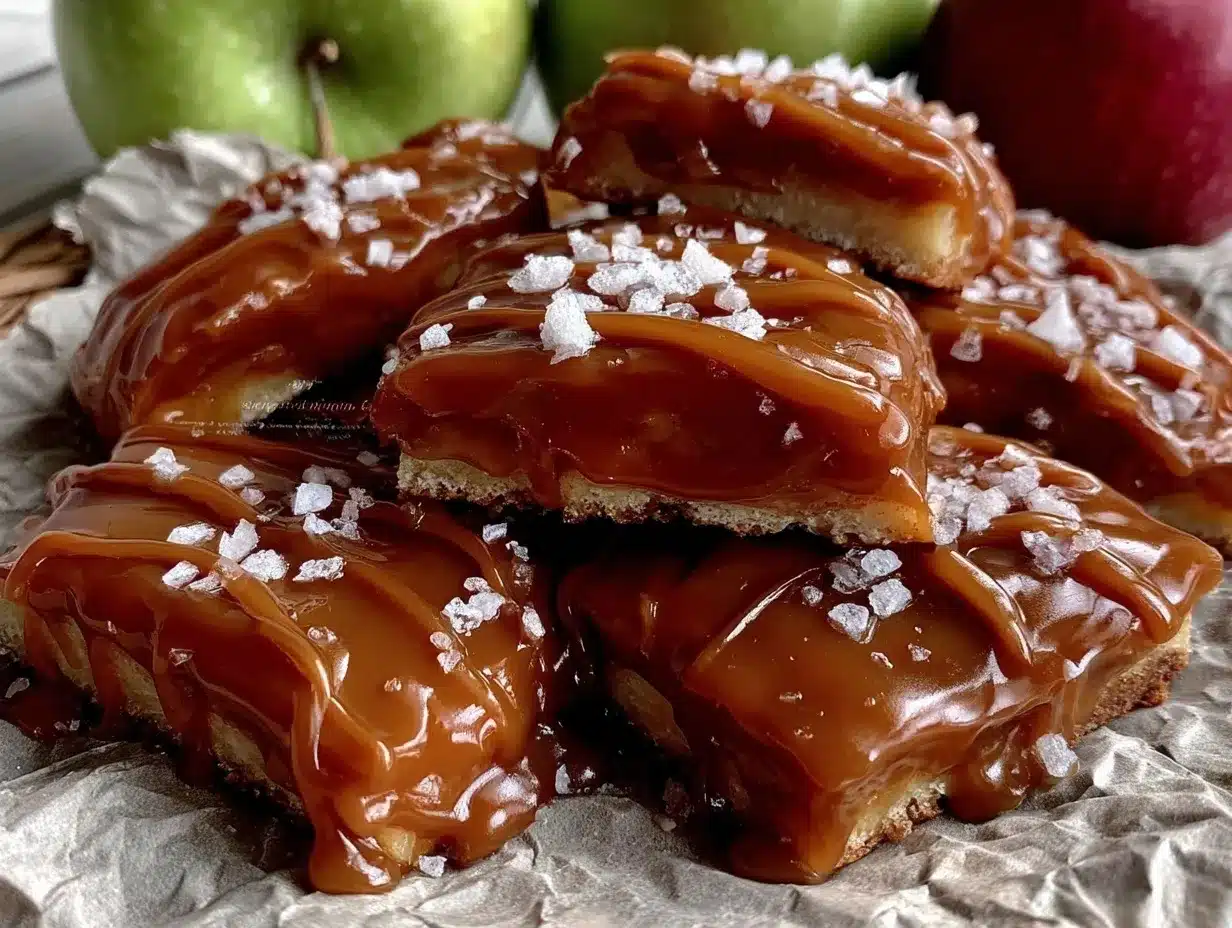
- Optional toppings: Chopped nuts, sea salt flakes, or mini chocolate chips for extra texture and flavor.
For the caramel, I recommend using a trusted brand of unsalted butter like Land O’Lakes — it melts evenly and has a clean flavor. When choosing apples, look for firm, blemish-free Granny Smiths to ensure crispness. If you want to mix things up, try Fuji or Honeycrisp apples, but know they’ll add sweetness rather than tartness.
Substitution tip: If you’re avoiding dairy, swap heavy cream for canned coconut milk (the thick part) and use a vegan butter alternative. The caramel won’t be quite the same, but it’s still delicious.
Equipment Needed
- Sharp knife: For slicing apples evenly — a serrated or paring knife works well.
- Large non-stick skillet or saucepan: To make the caramel sauce without sticking or burning.
- Wooden spoon or heatproof spatula: For stirring the caramel as it cooks.
- Baking sheet lined with parchment paper or silicone mat: For placing the caramel-coated apple slices to cool.
- Cooling rack (optional): Helps the caramel set evenly on the apple slices.
If you don’t have a non-stick skillet, a stainless steel pan works fine but watch the caramel closely to prevent scorching. I’ve made this recipe both on an electric stove and gas, and the gas flame gives a bit more even heat control. For a budget-friendly option, parchment paper is a lifesaver to keep cleanup quick and easy.
Preparation Method
- Prepare the apples: Wash and dry the Granny Smith apples thoroughly. Using a sharp knife, slice them into 1/4-inch thick rounds, removing any seeds. Lay the slices flat on a parchment-lined baking sheet. Set aside. (Prep time: 10 minutes)
- Make the caramel sauce: In your skillet over medium heat, melt 6 tablespoons of unsalted butter. Once melted, stir in 3/4 cup packed brown sugar until dissolved and bubbling gently. (Watch the heat carefully to avoid burning.)
- Add cream and vanilla: Slowly pour in 1/4 cup heavy cream while stirring continuously. Add 1 teaspoon vanilla extract and 1/4 teaspoon salt. The mixture should thicken and become glossy — this usually takes about 3-5 minutes.
- Coat the apple slices: Using tongs or a fork, dip each apple slice into the caramel, letting excess drip off before placing it back on the parchment paper. Work quickly but gently, so the caramel doesn’t harden before coating.
- Add optional toppings: If using, sprinkle chopped nuts, sea salt flakes, or mini chocolate chips over the caramel while it’s still warm.
- Let cool: Allow the caramel apple slices to set at room temperature for about 15 minutes, or pop them in the fridge for 10 minutes if you want them firmer.
- Serve and enjoy: These caramel apple slices are best enjoyed the day they’re made but can keep for up to 48 hours in an airtight container in the fridge.
Pro tip: If your caramel starts to thicken too quickly while dipping, gently reheat it over low heat for a few seconds to loosen it up. And don’t rush slicing the apples — uniform thickness ensures even caramel coverage and a great bite every time.
Cooking Tips & Techniques
Making caramel can feel intimidating, but this recipe keeps it simple and foolproof. Here are some tips I’ve learned (sometimes the hard way) to keep your caramel smooth and your apple slices perfect:
- Low and slow: Keep your heat at medium or medium-low when melting butter and sugar. High heat risks burning the sugar, which leads to a bitter flavor.
- Stir constantly: Don’t walk away while making the caramel. Stirring keeps the sugar from clumping and burning on the pan’s bottom.
- Use fresh ingredients: Old brown sugar or butter that’s been sitting too long can affect caramel texture and taste.
- Slice apples just before dipping: Apples oxidize quickly and brown, which can affect the look and taste. If you want to prep early, soak slices in a bit of lemon water to slow browning.
- Work in small batches: Dipping all the slices quickly before caramel cools helps prevent clumpy or uneven coating.
- Practice patience with cooling: Let the caramel set fully before stacking or storing slices to avoid sticky messes.
Once, I tried to speed up the cooling by popping the slices into the freezer — big mistake! The caramel cracked and became brittle. So, trust me, room temp or fridge chill is the sweet spot.
Variations & Adaptations
This recipe is pretty flexible, so you can easily tweak it to suit your tastes or dietary needs. Here are some ideas I’ve played around with and loved:
- Nutty twist: Roll the caramel-coated apple slices in chopped pecans or walnuts for a crunchy contrast.
- Spiced caramel: Add a pinch of cinnamon or pumpkin pie spice to the caramel sauce to deepen the autumn vibe.
- Chocolate drizzle: Melt some dark chocolate and drizzle over the caramel before it sets for a fancy flair.
- Dairy-free option: Use coconut cream and vegan butter to make this snack friendly for dairy-free diets.
- Different apples: Try crisp Fuji or Honeycrisp apples if you prefer a sweeter bite.
One time, I even swapped the brown sugar for maple syrup for a richer flavor, though it needed a bit more thickening time. If you want a twist on texture, you could sprinkle crushed sea salt flakes for an added pop.
Serving & Storage Suggestions
These caramel apple slices are best served chilled or at room temperature. I like to arrange them on a rustic wooden board with a little sprinkle of chopped nuts or a few extra sea salt flakes on top. They pair wonderfully with a warm cup of apple cider or even a hot latte (especially if you’re into cozy autumn vibes).
For storage, place the slices in a single layer on parchment paper inside an airtight container. Refrigerate for up to 2 days. When you’re ready to enjoy, let them sit out for 10 minutes to soften slightly — the caramel will soften and the apple will remain crisp. Avoid freezing; it changes the texture and can make the caramel grainy.
If you want to serve something alongside, these slices complement savory dishes like the easy crispy lemon herb chicken beautifully for a light lunch or snack break. They’re also a fun, easy sweet bite after a meal without being overly heavy.
Nutritional Information & Benefits
Each caramel apple slice offers a moderate amount of calories — mostly from the caramel’s sugar and butter, balanced by the fiber and vitamins in the apple. This snack provides a quick energy boost, thanks to natural sugars and a bit of fat for satiety.
- Calories per slice: approximately 90-110 kcal (depending on size and caramel thickness)
- Good source of Vitamin C and fiber from the apples
- Contains dairy (butter and cream) — can be swapped for vegan alternatives
- Gluten-free as written
From a wellness perspective, this recipe offers a satisfying treat that feels indulgent but isn’t loaded with artificial additives or preservatives. It’s a way to enjoy a classic fall favorite with a bit more control over ingredients and portions.
Conclusion
Easy irresistible caramel apple slices have become my go-to autumn snack for good reason. They’re quick to make, use simple ingredients, and strike that perfect balance of sweet and tart with a buttery caramel hug. Whether you’re sneaking bites between work or sharing with friends, this recipe fits the cozy season without fuss or mess.
Feel free to tweak the toppings and apple varieties to your liking. I love how versatile this recipe is — it can be as classic or as playful as you want. Honestly, it’s one of those little pleasures that make the season feel a bit warmer and sweeter.
If you try these caramel apple slices, I’d love to hear what variations you come up with or how you serve them. There’s nothing like swapping snack stories to keep the kitchen magic alive. Here’s to many cozy autumn bites ahead!
Frequently Asked Questions
Can I use other types of apples for caramel apple slices?
Yes! While Granny Smith apples are ideal for their tartness and crunch, you can use Fuji, Honeycrisp, or Gala apples. Just keep in mind sweeter apples will make the snack less tart.
How do I prevent the caramel from hardening too fast while dipping?
Keep the caramel warm on low heat and work in small batches. If it thickens too much, gently reheat it to loosen before dipping the next slices.
Can I make the caramel apple slices ahead of time?
It’s best to serve them the same day or store for up to 2 days refrigerated. Apples brown and caramel can get sticky if stored too long.
What’s the best way to store leftover caramel apple slices?
Place them in a single layer separated by parchment paper in an airtight container, then refrigerate. Let them come to room temp before eating for the best texture.
Can I make this recipe dairy-free?
Absolutely. Substitute heavy cream with coconut cream and use vegan butter instead of regular butter. The caramel will taste slightly different but still delicious.
Pin This Recipe!

Easy Irresistible Caramel Apple Slices Recipe for Perfect Autumn Snacks

This recipe offers a quick and easy way to make smooth, buttery caramel-coated apple slices that stay crisp and are perfect for autumn snacking. It’s less messy than traditional caramel apples and uses simple ingredients.
- Prep Time: 10 minutes
- Cook Time: 15 minutes
- Total Time: 25 minutes
- Yield: About 3 apples worth of slices (approximately 12-15 servings depending on slice size) 1x
- Category: Snack
- Cuisine: American
Ingredients
- 3 large Granny Smith apples, washed and thinly sliced (about 1/4 inch thick)
- 6 tablespoons unsalted butter, softened
- 3/4 cup packed brown sugar (light or dark)
- 1/4 cup heavy cream (full-fat; can substitute with coconut cream for dairy-free)
- 1 teaspoon vanilla extract
- 1/4 teaspoon salt
- Optional toppings: chopped nuts, sea salt flakes, mini chocolate chips
Instructions
- Wash and dry the Granny Smith apples thoroughly. Using a sharp knife, slice them into 1/4-inch thick rounds, removing any seeds. Lay the slices flat on a parchment-lined baking sheet. Set aside.
- In a large non-stick skillet or saucepan over medium heat, melt 6 tablespoons of unsalted butter.
- Once melted, stir in 3/4 cup packed brown sugar until dissolved and bubbling gently. Watch the heat carefully to avoid burning.
- Slowly pour in 1/4 cup heavy cream while stirring continuously. Add 1 teaspoon vanilla extract and 1/4 teaspoon salt. Stir until the mixture thickens and becomes glossy, about 3-5 minutes.
- Using tongs or a fork, dip each apple slice into the caramel, letting excess drip off before placing it back on the parchment paper. Work quickly but gently.
- If using, sprinkle chopped nuts, sea salt flakes, or mini chocolate chips over the caramel while it’s still warm.
- Allow the caramel apple slices to set at room temperature for about 15 minutes, or refrigerate for 10 minutes for a firmer texture.
- Serve and enjoy. Best eaten the day they’re made but can be stored in an airtight container in the fridge for up to 48 hours.
Notes
Keep heat medium or medium-low to avoid burning caramel. Stir constantly while cooking caramel. Slice apples just before dipping to prevent browning or soak in lemon water if prepping early. Work in small batches when dipping. Let caramel set fully before storing. Avoid freezing as it cracks the caramel.
Nutrition
- Serving Size: 1 caramel-coated app
- Calories: 90110
- Sugar: 12
- Sodium: 60
- Fat: 5
- Saturated Fat: 3
- Carbohydrates: 14
- Fiber: 1.5
- Protein: 0.5
Keywords: caramel apple slices, autumn snack, easy caramel recipe, fall treats, caramel apples, quick snack, Granny Smith apples