“Wait, you mean I don’t have to turn on the oven?” My sister-in-law, Jen, stood in my kitchen doorway, holding a store-bought pumpkin pie like it was a dirty secret. It was Thanksgiving Eve, and she had just confessed she forgot to pre-order the bakery pie. I laughed and pointed to the counter where my Easy No-Bake Pumpkin Pie with Gingersnap Crust was chilling in the fridge. She looked at it, then at the sad bakery box, and said, “That’s not fair. You cheated.” And honestly? She was right.
This pie is a cheat code. It came to life one October when my oven decided to quit right before a dinner party. I had pumpkin puree, a box of gingersnaps, and a desperate need for dessert. No baking, no fuss, just a lot of stirring and a whole lot of patience for the fridge to do its thing. The result was so ridiculously smooth and spiced, with that crunchy, buttery gingersnap crust, that it became my go-to. It’s the dessert that saves you when life gets in the way, or when you just don’t feel like standing over a hot stove.
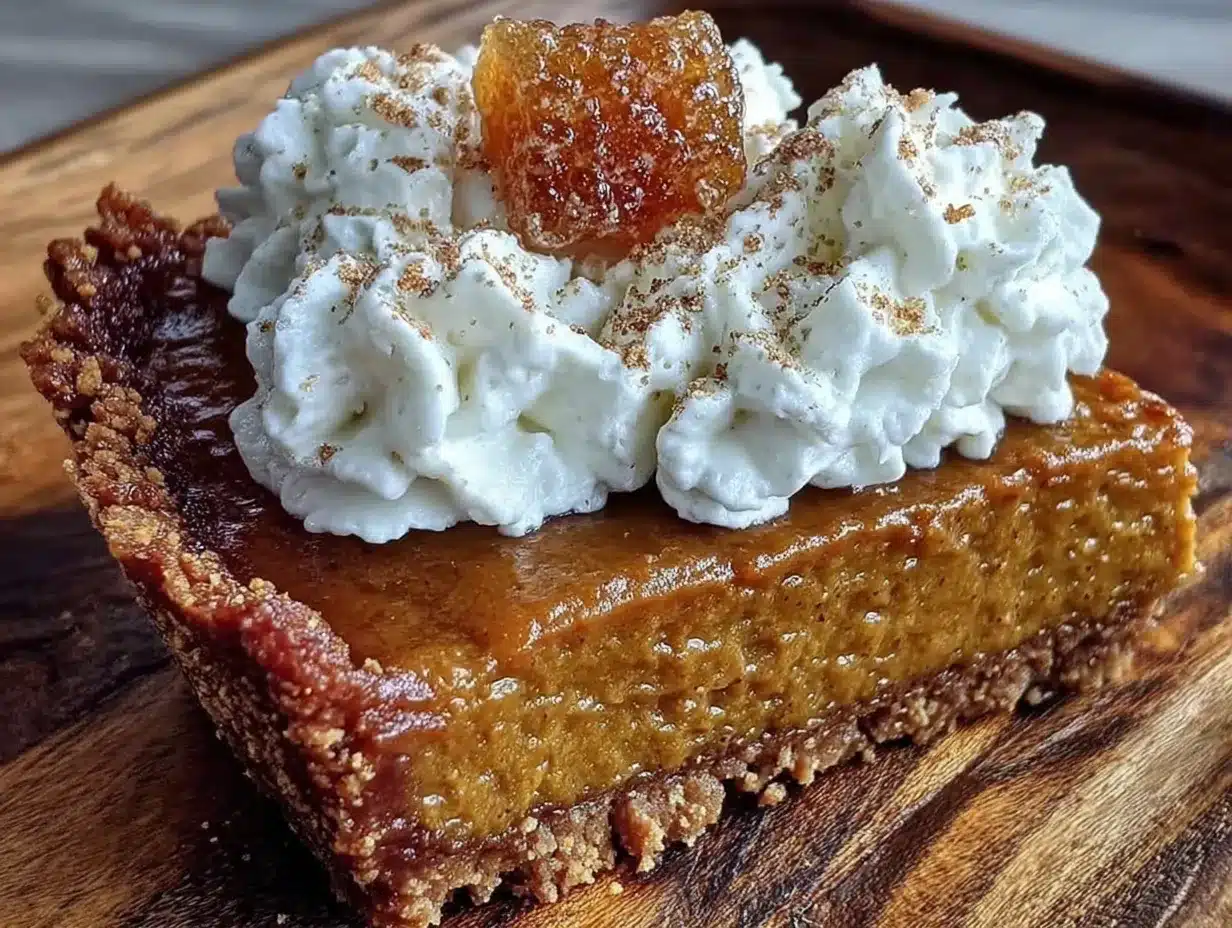
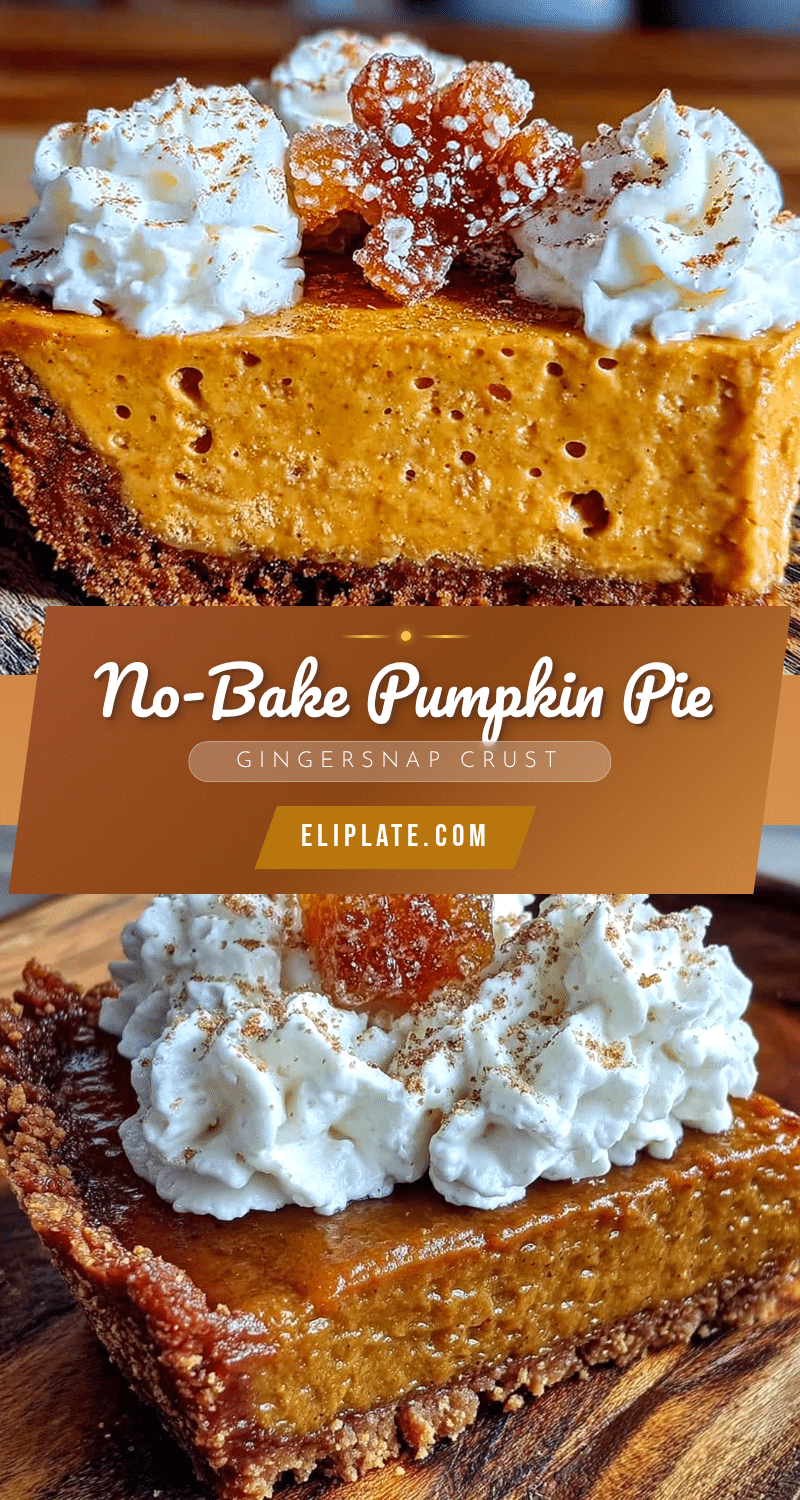
There’s something about a no-bake pie that feels like a secret handshake among cooks. It says, “I know the good stuff doesn’t need heat.” This Easy No-Bake Pumpkin Pie has a texture that’s almost like a mousse—light, airy, but with that familiar pumpkin punch. And the crust? It’s not a sad, soggy thing. It’s a crisp, spiced crunch that holds everything together. You’ll never look at a traditional pumpkin pie the same way again. I promise.
Why You’ll Love This Recipe
Let me tell you why this pie has become my most-requested fall dessert. It’s not just because it’s easy—though, let’s face it, that’s a huge part of it. It’s because every single time I serve it, someone asks for the recipe. Here’s what makes it a winner:
- No Oven Required: This is the ultimate “set it and forget it” dessert. No blind baking, no worrying about cracks, no checking on it every five minutes. Your oven can stay off, and your kitchen stays cool.
- Simple, Honest Ingredients: You likely have most of this in your pantry right now. A can of pumpkin, some cream cheese, whipped topping, and a box of gingersnaps. No weird extracts or obscure spices.
- Perfect for Fall Gatherings: Whether it’s Thanksgiving, a Friendsgiving potluck, or just a cozy Tuesday night, this pie fits right in. It’s elegant enough to impress but humble enough to feel like home.
- Crowd-Pleasing Texture: The filling is like a cloud—light, creamy, and perfectly spiced. The crust adds that essential crunch. It’s a textural dream.
- Make-Ahead Magic: This pie needs at least 6 hours to set, which means you can make it the night before. That’s one less thing to worry about on the big day.
What makes this version different from the rest? It’s the crust, my friend. Most no-bake pumpkin pies use a graham cracker crust, which is fine, but it’s a bit boring. The gingersnap crust brings a warm, spicy kick that perfectly complements the creamy pumpkin filling. It’s not just a pie; it’s a flavor experience. Plus, the filling uses a secret trick—a bit of instant vanilla pudding mix—that gives it a stable, silky texture without any gelatin. It’s foolproof, and I’ve tested it a dozen times to make sure.
This is the kind of pie that makes you close your eyes after the first bite. It’s comfort food, reimagined. It’s the dessert that says, “I’ve got this,” even when you’re running late. And that’s a beautiful thing.
What Ingredients You Will Need
This recipe uses simple, wholesome ingredients to create a dessert that tastes like you spent hours in the kitchen. Most of these are pantry staples, especially if you’re a fall baking enthusiast. Let’s break down what you’ll need and why each one matters.
For the Gingersnap Crust
- 2 cups (200g) gingersnap cookies, crushed: This is the star of the crust. I recommend using a brand like Nabisco or Anna’s for the best texture. You want a fine crumb, almost like sand. A food processor makes this a breeze, but a rolling pin and a zip-top bag work just fine.
- 6 tablespoons (85g) unsalted butter, melted: This binds the crumbs together. Use melted, not softened, butter for the best results. If you use salted butter, just skip the added salt in the crust.
- 2 tablespoons (25g) granulated sugar: Just a touch of sweetness to balance the spicy gingersnaps. You can skip this if your cookies are very sweet.
- Pinch of salt: A little salt enhances all the flavors. Don’t skip it.
For the Pumpkin Filling
- 1 package (8 oz, 226g) cream cheese, softened: This is the base of the filling. It needs to be at room temperature so it blends smoothly. No one wants lumpy pie filling. I always use full-fat cream cheese for the best texture and flavor.
- 1 cup (200g) granulated sugar: Sweetness to balance the earthy pumpkin and tangy cream cheese.
- 1 can (15 oz, 425g) pumpkin puree: Not pumpkin pie filling! Make sure you get 100% pure pumpkin. Libby’s is my go-to brand. It’s consistent and has a great flavor.
- 1 teaspoon vanilla extract: Pure vanilla, if you have it. It adds a warm depth to the filling.
- 1 teaspoon ground cinnamon: The classic pumpkin pie spice. It’s essential.
- ½ teaspoon ground ginger: This adds a little warmth and kick. It pairs beautifully with the gingersnap crust.
- ¼ teaspoon ground nutmeg: Freshly grated is best, but pre-ground works in a pinch.
- ¼ teaspoon ground cloves: A little goes a long way. It adds that classic holiday aroma.
- 1 package (3.4 oz, 96g) instant vanilla pudding mix: This is my secret ingredient. It stabilizes the filling and gives it a silky, mousse-like texture without any baking. Don’t use cook-and-serve pudding; it won’t work the same way.
- 1 ½ cups (360ml) cold heavy whipping cream: This gets whipped into stiff peaks and folded into the filling, making it light and airy. You can use a store-bought whipped topping if you’re in a hurry, but homemade is so much better.
Substitution Guidance: For a dairy-free version, use a dairy-free cream cheese and coconut cream (chilled, solid part only) instead of heavy cream. For a gluten-free crust, use gluten-free gingersnap cookies. The filling itself is naturally gluten-free. If you don’t have instant vanilla pudding mix, you can use two tablespoons of cornstarch, but the texture will be slightly different—a bit denser and less stable.
Equipment Needed
You don’t need a fancy kitchen to make this pie. Here’s what you’ll need, along with a few tips from my own experience.
- 9-inch pie dish: A standard glass or ceramic pie dish works perfectly. I love my Pyrex dish because I can see the crust through the bottom.
- Food processor or rolling pin: For crushing the gingersnaps. A food processor is faster and gives a finer crumb, but a rolling pin and a zip-top bag do the job. Just make sure to crush them until they are very fine.
- Electric mixer (hand or stand): You’ll need this to whip the cream and beat the cream cheese. A hand mixer is totally fine. A stand mixer is a luxury, not a necessity.
- Large mixing bowls: One for the crust ingredients, one for the filling, and one for the whipped cream. I recommend using glass or stainless steel bowls.
- Rubber spatula: For folding the whipped cream into the pumpkin mixture. A gentle hand is key here.
- Measuring cups and spoons: Accuracy is important, especially for the spices.
- Plastic wrap: To cover the pie while it chills.
Budget-Friendly Options: If you don’t have a food processor, a rolling pin works great. If you don’t have an electric mixer, you can whisk the cream by hand, but it will take some serious arm strength. I’ve done it before, and it’s a good workout, but I prefer the mixer for consistency.
Preparation Method
Alright, let’s get to the fun part. This recipe is broken down into simple steps. Follow them, and you’ll have a stunning pie that tastes like you slaved away.
- Make the crust: In a medium bowl, combine the crushed gingersnap cookies, melted butter, sugar, and salt. Stir with a fork until the mixture looks like wet sand and holds together when pressed. Press the mixture firmly into the bottom and up the sides of your 9-inch pie dish. Use the bottom of a measuring cup to get it really compact. Pop it in the fridge to chill while you make the filling.
- Whip the cream: In a large, chilled bowl, pour the cold heavy cream. Using an electric mixer on medium-high speed, beat the cream until stiff peaks form. This takes about 3-4 minutes. Be careful not to over-whip, or you’ll end up with butter. You’ll know it’s ready when you lift the beaters and the cream stands up in firm peaks. Set it aside in the fridge.
- Beat the cream cheese: In another large bowl, beat the softened cream cheese with an electric mixer on medium speed until it’s smooth and creamy, about 1 minute. Scrape down the sides of the bowl.
- Add the sugar and pumpkin: Add the granulated sugar to the cream cheese and beat until combined. Then, add the pumpkin puree, vanilla extract, cinnamon, ginger, nutmeg, and cloves. Beat on medium speed until everything is smooth and well-incorporated. Scrape down the bowl again.
- Mix in the pudding: Sprinkle the instant vanilla pudding mix over the pumpkin mixture. Beat on low speed until it’s just combined. The mixture will start to thicken slightly. Don’t overmix at this stage.
- Fold in the whipped cream: Take the whipped cream out of the fridge. Add about one-third of it to the pumpkin mixture. Use a rubber spatula to gently fold it in, using a cutting motion and turning the bowl. This lightens the mixture. Once it’s mostly incorporated, add the remaining whipped cream and fold until no white streaks remain. The filling should be light, airy, and a beautiful pale orange color.
- Assemble the pie: Take the crust out of the fridge. Spoon the filling into the crust. Use your spatula to spread it evenly, making sure it reaches the edges. Give the pie dish a gentle tap on the counter to release any air bubbles.
- Chill: Cover the pie loosely with plastic wrap and refrigerate for at least 6 hours, but overnight is best. This allows the filling to set completely. Don’t rush this step! A well-chilled pie slices cleanly and holds its shape.
- Serve: When you’re ready to serve, you can garnish with a dollop of whipped cream, a sprinkle of cinnamon, or some extra crushed gingersnaps. Slice with a sharp knife, wiping it clean between cuts for the prettiest slices.
Pro Tip: If your cream cheese is cold, you can soften it quickly by cutting it into small cubes and letting it sit on the counter for 15 minutes. Or, you can microwave it in 10-second bursts, but be careful—you don’t want it to melt.
Cooking Tips & Techniques
Over the years, I’ve made this pie more times than I can count, and I’ve learned a few things the hard way. Here are my best tips to ensure your pie is perfect every time.
- Room temperature ingredients are key: This is non-negotiable. Cold cream cheese will give you a lumpy filling. Cold pumpkin puree can make the mixture seize up. Let everything sit out for about 30 minutes before you start.
- The crust needs to be compact: A loose crust will crumble when you slice the pie. Use the bottom of a flat measuring cup or a glass to really press the crumbs down. I like to go over it twice to make sure it’s solid.
- Don’t over-whip the cream: This is the most common mistake. Whip it until it just holds stiff peaks. If you go too far, it will start to look grainy and separate, and you’ll have to start over. I’ve done it, and it’s sad.
- Fold, don’t stir: When you add the whipped cream to the pumpkin mixture, use a gentle folding motion. Stirring will deflate the cream and make your pie dense and heavy. Be patient and gentle.
- Chill time is crucial: I know it’s tempting to dig in after a couple of hours, but the pie needs time to set. The pudding mix needs to hydrate and the whole thing needs to firm up. Six hours is the minimum; overnight is the sweet spot.
- Use a sharp knife for slicing: A dull knife will drag through the filling and make a mess. Run the knife under hot water, dry it, and then slice. Wipe the blade clean between each cut for perfect slices.
Variations & Adaptations
One of the best things about this recipe is how versatile it is. You can change it up to suit your mood, your diet, or what you have on hand. Here are some of my favorite variations.
- Gluten-Free Version: This is super easy. Just use gluten-free gingersnap cookies for the crust. The filling is naturally gluten-free, so you’re all set. I’ve used the brand “Partake” with great results.
- Vegan Version: Use a dairy-free cream cheese (like Kite Hill or Tofutti) and full-fat coconut cream (chilled, solid part only) instead of heavy cream. Make sure your gingersnaps are vegan—some brands use honey. The texture will be slightly different, but it’s still delicious.
- Pumpkin Cheesecake Twist: For a richer, denser pie, double the cream cheese to 16 ounces and reduce the heavy cream to 1 cup. The texture will be more like a cheesecake than a mousse. It’s divine.
- Spice It Up: If you love a warm, spicy kick, add ¼ teaspoon of cayenne pepper or a pinch of black pepper to the filling. It sounds weird, but it really brings out the pumpkin flavor.
- Boozy Version: For an adult twist, add 2 tablespoons of dark rum or bourbon to the pumpkin mixture before folding in the cream. It adds a lovely warmth and complexity.
- Individual Servings: Instead of a pie dish, make this in 6-8 small mason jars or ramekins. Layer the crust and filling for a pretty parfait effect. They’re perfect for parties.
I once tried a variation using chocolate wafer cookies for the crust instead of gingersnaps. It was good, but honestly, the gingersnap is the winner. The spice is just right.
Serving & Storage Suggestions
This pie is best served cold, straight from the fridge. The filling is firm but creamy, and the crust is crisp. Here’s how to make it look and taste its best.
Serving: Take the pie out of the fridge about 10-15 minutes before you plan to serve it. This takes the chill off just a bit and allows the flavors to open up. Slice it with a sharp knife, wiping it clean between cuts. I like to serve each slice with a generous dollop of freshly whipped cream and a light dusting of cinnamon or nutmeg. A few extra crushed gingersnaps on top add a lovely crunch.
Pairings: This pie is wonderful on its own, but it’s even better with a hot cup of coffee or a mug of spiced apple cider. For a truly decadent dessert, serve it alongside a scoop of vanilla bean ice cream. The cold, creamy ice cream against the spiced pie is a match made in heaven. You could also pair it with a slice of Brown Butter Pumpkin Chocolate Chip Bread for the ultimate fall dessert board.
Storage: Store any leftover pie in the refrigerator, tightly covered with plastic wrap or in an airtight container. It will keep for up to 4 days. The crust may soften slightly over time, but it will still be delicious. I do not recommend freezing this pie. The texture of the filling can become watery and grainy when thawed. If you absolutely must, you can freeze it for up to 1 month, but I can’t promise the same quality.
Reheating: This is a no-bake pie, so there’s no need to reheat it. In fact, I wouldn’t recommend it. The filling will melt and become a puddle. Enjoy it cold.
Nutritional Information & Benefits
While this is a dessert, it does have some redeeming qualities. Here’s a rough estimate of the nutritional values per slice (based on 8 servings).
| Nutrient | Amount per Serving |
|---|---|
| Calories | 410 |
| Total Fat | 26g |
| Saturated Fat | 15g |
| Cholesterol | 85mg |
| Sodium | 320mg |
| Total Carbohydrates | 42g |
| Dietary Fiber | 3g |
| Sugars | 28g |
| Protein | 5g |
| Vitamin A | 180% DV |
| Calcium | 8% DV |
Health Benefits: Pumpkin is packed with Vitamin A, which is great for your eyes and immune system. It’s also a good source of fiber, which helps with digestion. The cream cheese and heavy cream provide calcium for strong bones. Of course, this is still a treat, so enjoy it in moderation. It’s the perfect ending to a balanced meal.
Dietary Considerations: As written, this recipe contains gluten (from the gingersnaps), dairy (from the cream cheese and cream), and eggs (if your cream cheese contains them). For gluten-free and vegan adaptations, see the Variations section above. This recipe is nut-free as written.
Conclusion
This Easy No-Bake Pumpkin Pie with Gingersnap Crust is more than just a dessert; it’s a lifesaver. It’s the recipe that proves you don’t need an oven to create something spectacular. It’s for the times when you want to impress without the stress, when you want a taste of fall without a lot of fuss.
I love this pie because it’s forgiving. It doesn’t care if you’re a beginner or a seasoned baker. It just wants to be made and shared. The first time I made it for a Thanksgiving potluck, I was nervous. Everyone else brought these elaborate, baked creations. My pie sat there, humble and cold. But by the end of the night, it was the first dish to be scraped clean. People kept coming back for “just one more bite.” That’s the power of a good no-bake pie.
Now it’s your turn. I want you to make this pie your own. Maybe you’ll add a little extra ginger, or top it with candied pecans. Maybe you’ll serve it at a Halloween party alongside some Pumpkin Graveyard Brownie Bites. Whatever you do, I hope you enjoy every single spoonful. And when you do, come back and tell me about it. Leave a comment below, share a photo on Pinterest, or tag me in your creation. I can’t wait to see what you make!
Frequently Asked Questions
Can I use pumpkin pie filling instead of pumpkin puree?
No, please don’t. Pumpkin pie filling is already sweetened and spiced. Using it in this recipe will throw off the sugar and spice balance completely. Stick with 100% pure pumpkin puree for the best results.
My pie filling is too soft. What did I do wrong?
This usually happens for one of two reasons: either the pie wasn’t chilled long enough, or the heavy cream wasn’t whipped to stiff peaks. Make sure you chill the pie for at least 6 hours, and when you whip the cream, look for firm peaks that hold their shape. Also, make sure you are using instant pudding mix, not cook-and-serve.
Can I make this pie ahead of time for Thanksgiving?
Absolutely! In fact, I recommend it. This pie is perfect for making the day before. It needs a full night in the fridge to set, so making it a day ahead is ideal. Just cover it tightly with plastic wrap and keep it refrigerated until you’re ready to serve.
How do I crush the gingersnaps without a food processor?
Easy! Place the cookies in a large zip-top bag, seal it, and use a rolling pin to crush them into fine crumbs. You can also use the bottom of a heavy pan or even a meat mallet. Just be patient and make sure you get an even crumb.
Can I use a different type of cookie for the crust?
Yes, you can! Graham crackers are the classic substitute, but you can also use vanilla wafers, shortbread cookies, or even chocolate wafers. Keep in mind that the flavor of the crust will change. If you use a less spicy cookie, you might want to add a pinch of cinnamon or ginger to the crust mixture.
Pin This Recipe!
Easy No-Bake Pumpkin Pie with Gingersnap Crust
This no-bake pumpkin pie features a creamy, mousse-like filling and a crunchy gingersnap crust. It’s a simple, foolproof dessert that requires no oven and is perfect for fall gatherings.
- Prep Time: 20 minutes
- Cook Time: 0 minutes
- Total Time: 6 hours 20 minutes (includes chilling)
- Yield: 8 servings 1x
- Category: Dessert
- Cuisine: American
Ingredients
- 2 cups (200g) gingersnap cookies, crushed
- 6 tablespoons (85g) unsalted butter, melted
- 2 tablespoons (25g) granulated sugar
- Pinch of salt
- 1 package (8 oz, 226g) cream cheese, softened
- 1 cup (200g) granulated sugar
- 1 can (15 oz, 425g) pumpkin puree
- 1 teaspoon vanilla extract
- 1 teaspoon ground cinnamon
- ½ teaspoon ground ginger
- ¼ teaspoon ground nutmeg
- ¼ teaspoon ground cloves
- 1 package (3.4 oz, 96g) instant vanilla pudding mix
- 1 ½ cups (360ml) cold heavy whipping cream
Instructions
- Make the crust: In a medium bowl, combine the crushed gingersnap cookies, melted butter, sugar, and salt. Stir with a fork until the mixture looks like wet sand and holds together when pressed. Press the mixture firmly into the bottom and up the sides of your 9-inch pie dish. Use the bottom of a measuring cup to get it really compact. Pop it in the fridge to chill while you make the filling.
- Whip the cream: In a large, chilled bowl, pour the cold heavy cream. Using an electric mixer on medium-high speed, beat the cream until stiff peaks form. This takes about 3-4 minutes. Be careful not to over-whip, or you’ll end up with butter. You’ll know it’s ready when you lift the beaters and the cream stands up in firm peaks. Set it aside in the fridge.
- Beat the cream cheese: In another large bowl, beat the softened cream cheese with an electric mixer on medium speed until it’s smooth and creamy, about 1 minute. Scrape down the sides of the bowl.
- Add the sugar and pumpkin: Add the granulated sugar to the cream cheese and beat until combined. Then, add the pumpkin puree, vanilla extract, cinnamon, ginger, nutmeg, and cloves. Beat on medium speed until everything is smooth and well-incorporated. Scrape down the bowl again.
- Mix in the pudding: Sprinkle the instant vanilla pudding mix over the pumpkin mixture. Beat on low speed until it’s just combined. The mixture will start to thicken slightly. Don’t overmix at this stage.
- Fold in the whipped cream: Take the whipped cream out of the fridge. Add about one-third of it to the pumpkin mixture. Use a rubber spatula to gently fold it in, using a cutting motion and turning the bowl. This lightens the mixture. Once it’s mostly incorporated, add the remaining whipped cream and fold until no white streaks remain. The filling should be light, airy, and a beautiful pale orange color.
- Assemble the pie: Take the crust out of the fridge. Spoon the filling into the crust. Use your spatula to spread it evenly, making sure it reaches the edges. Give the pie dish a gentle tap on the counter to release any air bubbles.
- Chill: Cover the pie loosely with plastic wrap and refrigerate for at least 6 hours, but overnight is best. This allows the filling to set completely. Don’t rush this step! A well-chilled pie slices cleanly and holds its shape.
- Serve: When you’re ready to serve, you can garnish with a dollop of whipped cream, a sprinkle of cinnamon, or some extra crushed gingersnaps. Slice with a sharp knife, wiping it clean between cuts for the prettiest slices.
Notes
Room temperature ingredients are key for a smooth filling. The crust needs to be compact to avoid crumbling. Chill time is crucial—at least 6 hours, overnight is best. Use a sharp knife for slicing, wiping clean between cuts.
Nutrition
- Serving Size: 1 slice (1/8 of pie)
- Calories: 410
- Sugar: 28
- Sodium: 320
- Fat: 26
- Saturated Fat: 15
- Carbohydrates: 42
- Fiber: 3
- Protein: 5
Keywords: no-bake pumpkin pie, gingersnap crust, easy pumpkin pie, fall dessert, Thanksgiving dessert, no oven pumpkin pie